Naming Conventions! Please, Apple?

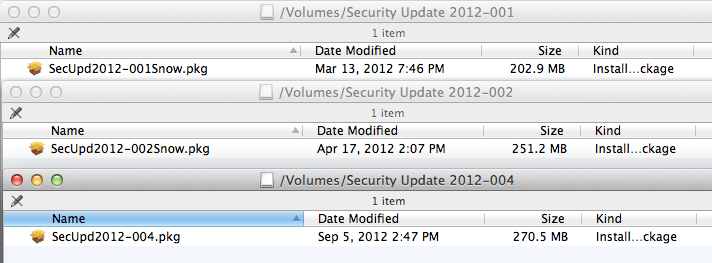
Apple, there was a time when your updates had naming conventions for the various platforms there were targeted for. Suffixes like Tiger, Leopard, Snow, etc. made it easy to identify for what platform an update package was intended.

SnowSecurityUpdates
Names used to be useful, who did you hire between April and September of 2012?

But then something happened. Somewhere after Snow Leopard 2012-002 and the first appearance of the 10.7/10.8 Java updates: form trumped function and all useful naming conventions were removed.

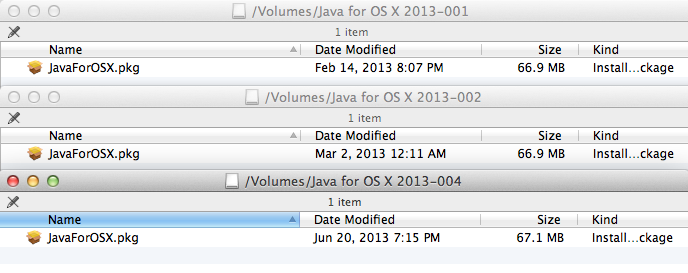
Which Java
Elegantly named and informational useless packages. Beautiful.

In the case of Java not just the platform name, but even what release number was removed too! Oh sure, someone took the time to change the disk image volume name, thanks, but once it was copied out of there, good luck in keeping things straight! Since these are flat packages now, Finder can’t tell you the version number in column view anymore, either.

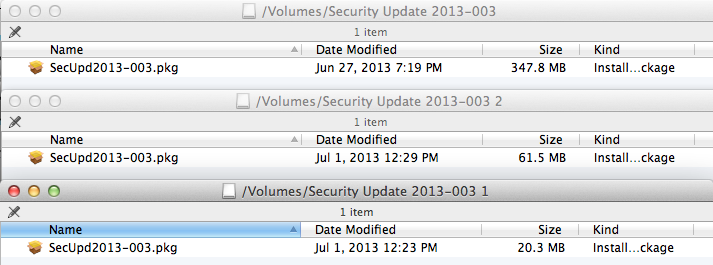
WhichSecurityUpdate
What platform are you for? Should I just chuck all these at a machine and see what sticks?

How about the latest security updates? They all named the same! What a mess! Note that now even the disk image names are all the same too and the system has to resort to appending numbers on the volume name to avoid naming conflicts.

So Apple, if you are going to keep putting out security updates for older platforms then let’s stop pretending there is only one OS X release out there and start naming updates appropriately! Please? Thanks!

P.S. I’ve submitted a bug and mirrored it at Open Radar, if you are a systems administrator who is also irked by this trend of needless naming minimalism I encourage you to file a bug report and see if we can turn this around!

Silverlight: the next plugin Apple will be blocking

Shhh… Silverlight’s been updated for Mac

So by shear accident, I was in Windows 7 via Boot Camp today. I decided to run updates and actually look at what was being updated. I noticed there was a new Silverlight update, 5.1.20125.0, speak of the devil, in my XProtect Plugin Checker post, not long ago, I speculate when Silverlight will be blocked by Apple because of a security update. Security bulletin MS13-022 explains the critical nature of this for Windows and Mac, if you want to see an MS engineer tell you it’s Priority 1 this month you can visit the Microsoft March 2013 security update page. You’ll need Silverlight to watch the video, but don’t worry it won’t give you prompt you to update. Neither does Netflix. Apparently Microsoft haven’t pulled the trigger to alert users with old Silverlight plugins! Are they waiting for this 14.9MB package to replicate around the world to all the Akamai distribution servers or something? I think it’s done now.

Whither Thou Goest Check for Updates (or Preferences for that matter)?

So I decided to double check my auto-update settings in Silverlight. Would you like to check your Silverlight Preferences? The easy way is to Control-Click/Right-Click on Silverlight content and select About Silverlight from the menu. But take a real world example: you are at a site that won’t load it’s Silverlight content because the caches need cleaning! (This really happened to someone I had to support remotely via email).

Let’s go spelunking!
Opening Silverlight Preferences the hard way:

Navigate to /Library/Internet Plug-Ins
Control-Click on Silverlight.plugin and Show Package Contents
Navigate into Contents/Resources
Double click Silverlight Preferences.app

Or type this in at Terminal:

open /Library/Internet\ Plug-Ins/Silverlight.plugin/Contents/Resources/Silverlight\ Preferences.app

I ended up making a .command file to do this, zipped it up, and emailed it so the user could simply empty the Silverlight caches and get back to work (if this was for real work or Netflix I’m not sure…) but regardless, a Preference Pane would be kinda nice MS Silverlight dev folks! All it has to do, at bare minimum, is open this very same app inside the plugin bundle (so we don’t have to dig for it). That’s what the Oracle Java 7 prefPane does. I digress here’s my settings:

SilverlightUpdates

Yep that’s set…
OK so Microsoft doesn’t think this Priority 1 update needs updating yet on the Mac?

For fun, in the same folder you can run UpdatePrompt.app to see this:
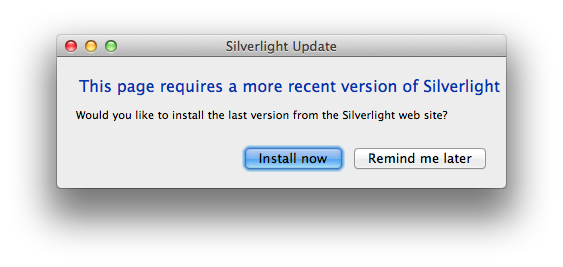
SilverlightUpdatePrompt

Clicking Install now launches the URL: http://go2.microsoft.com/fwlink/?LinkId=116053 which will automatically start downloading the newest version of Silverlight.

Exploring the XProtect Factor

Now, I though to myself, if Microsoft doesn’t start getting people to update, I think I know what Apple’s gonna do… but they haven’t done it yet. So I did. I edited my XProtect.meta.plist and blocked Silverlight myself:
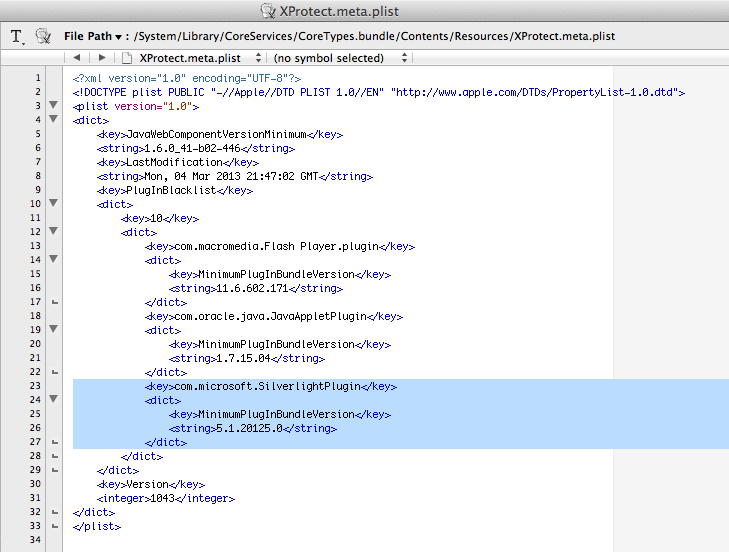
XprotectMetaBlockSilverlight

Just wedged it right in there with TextWrangler! Now, what happens when I visit a Silverlight page in Safari?
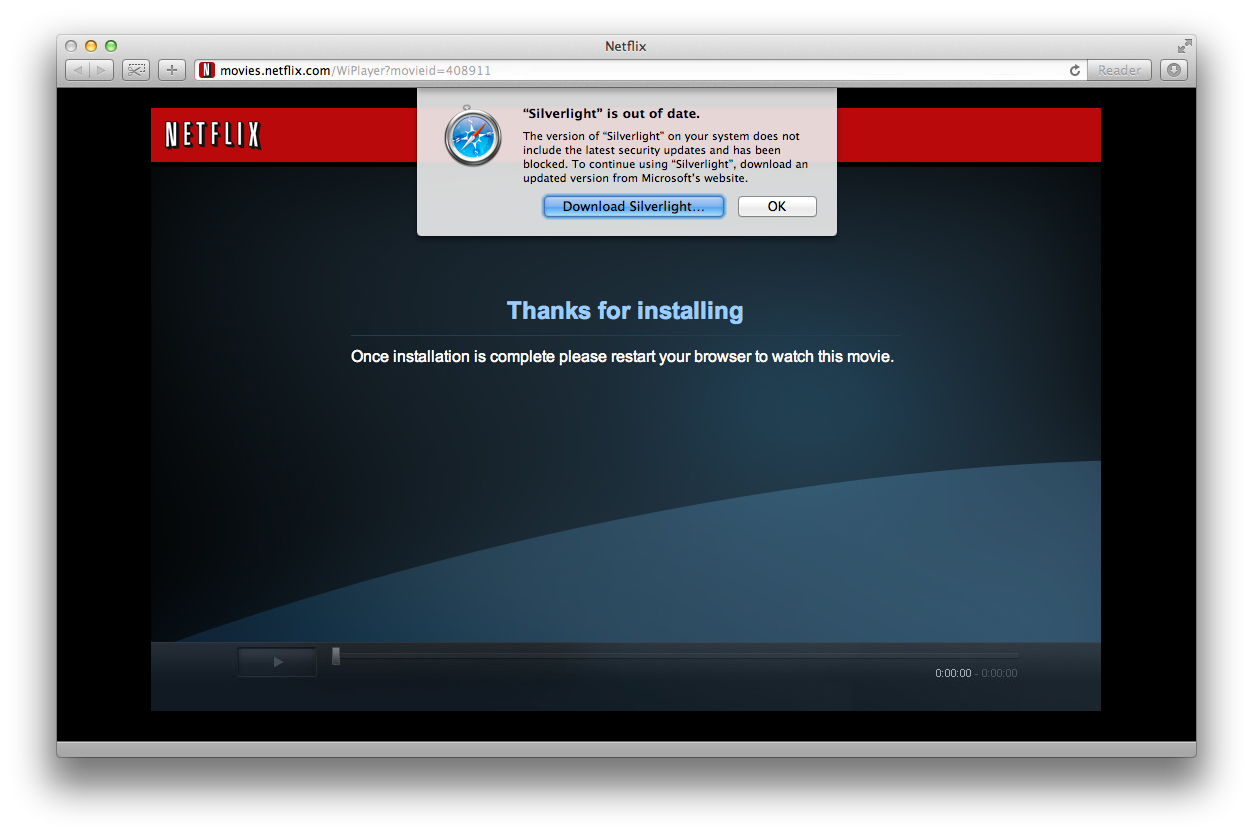
Blocked @ Netflix

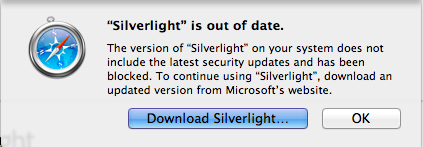
Boom, blocked. Aha! This mechanism is quite extensible to whatever plugin Apple deems insecure. Interestingly though, this warning will appear only once in Safari.
Blocked Small

After that your Silverlight content will simply not load and you won’t be told why. The bundle name and version are set under the PreviouslyAnnouncedBlockedPlugins key in com.apple.Safari.plist and that’s it. Clicking OK in a hurry without reading the message might leave you scratching your head, while repeatedly clicking reload at Netlflix.

Safari Warning XML

Taking a peek at my XProtectPluginChecker I see it’s able to compare the installed version to the values XProtect.meta.plist has. My script is working dynamically, as planned, yay! (I fixed a couple bugs the first few days after posting so re-download if you were an early bird user)
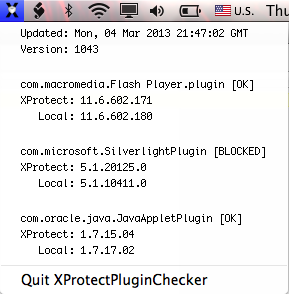
XProtectPluginChecker-silverlightBlockedSo while you may not be seeing this yet I have a strong feeling you will… and when you do XProtectPluginChecker will let you know.

System Administrator Bonus

Say, Mac SysAdmins, wanna disable Silverlight on all your deployed Macs right now? Why? Maybe you want to turn it off right away and worry about installing the update later? BTW this does not block the plugin in Firefox (they have their own mechanism), Safari only.

sudo /usr/libexec/PlistBuddy -x -c "add :PlugInBlacklist:10:com.microsoft.SilverlightPlugin dict" /System/Library/CoreServices/CoreTypes.bundle/Contents/Resources/XProtect.meta.plist
sudo /usr/libexec/PlistBuddy -x -c "add :PlugInBlacklist:10:com.microsoft.SilverlightPlugin:MinimumPlugInBundleVersion string 5.1.20125.0" /System/Library/CoreServices/CoreTypes.bundle/Contents/Resources/XProtect.meta.plist

That’ll get your XProtect.meta.plist PluginBlacklist dictionary looking something like this (version vary between 10.6 and 10.7/10.8 machines):
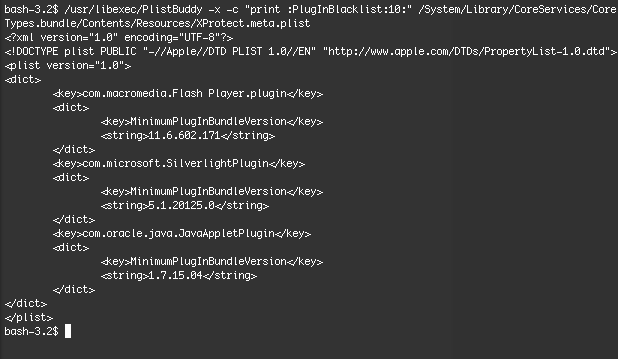
XProtectXML Viola, your Silverlight don’t work no more. :] Now go update it!


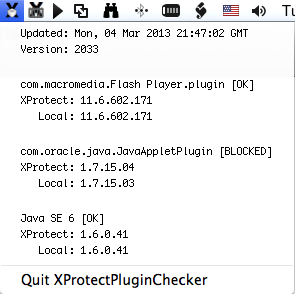
XProtect Plugin Checker

Are you a system administrator or power user who needs a quick way to check if your Flash or Java plugins have been blocked by Apple? Like so:XProtectPluginChecker Menu 2

Then XProtectPluginChecker is the status menu app for you!

XProtect Plugin Checker iconClick to download.

Written in BASH, sprinkled with PlistBuddy/awk/sed-Fu with a dash of mdfind magic, and wrapped with Platypus, the aim is for XProtect Plugin Checker to be able to dynamically accommodate any additions Apple might make to the Plugin Blacklist, although only Flash and Java seem to be in their crosshairs right now, who knows? Silverlight might be next, given its lack of updates (going on 10 months).

A bonus idea for making this more useful is to make a launchd script that watches the XProtect plist file(s) then fires off the XProtectPluginChecker script when they change, emailing the results to you, because knowing is half the battle!

If you find this useful or if you have some hiccups with it, let me know. UPDATE: Now with comments enabled! :]

Also related, myXProtectStatus is a similar style menu status script that lists the malware threats Apple is blocking.

Check Multiple iMacs for 1TB Seagate Repair Program Eligibility

Apple recently announced that certain iMacs with 1TB Seagate hard drives are eligible for replacement. If you have one iMac it’s easy to check it on their website here.

However if you have a lot of iMacs at your company you might prefer to do this a bit more quickly! The following command can be sent via ARD:

curl  "https://supportform.apple.com/201107/SerialNumberEligibilityAction.do?cb=iMacHDCheck.response&sn=$(ioreg -c "IOPlatformExpertDevice" | awk -F '"' '/IOPlatformSerialNumber/ {print $4}')" 2>/dev/null

To explain: It’s using curl to send a request to the Apple URL, the sn= field is populated with the results of the ioreg command, which is cleaned up with awk (thanks OS X Hints), stderr of curl is sent to /dev/null so you don’t get the download/progress output that curl usually displays.

Another variation is if you already have a list of serial numbers, separated with some sort of whitespace. You can put them in a bash variable and loop though them locally:

serialNumbers="QP0231XXXPK
QP0240XXYRU
D25FP1TXXXJT
QP6481XXXUW"

for number in $serialNumbers; do echo $number $(curl "https://supportform.apple.com/201107/SerialNumberEligibilityAction.do?cb=iMacHDCheck.response&sn=$number" 2>/dev/null); done

This outputs the serial number queried and the response from the Apple server on each line. E03 the response you’ll be looking for. I’ll leave it to you the reader if you want to do any additional cleanup of the output, here’s a sample:

QP0231XXXPK iMacHDCheck.response({"ERROR_CODE":"E08","ERROR_DESC":"Valid iMac SN but WoM is outside of program range"})
QP0240XXXRU iMacHDCheck.response({"ERROR_CODE":"E03","ERROR_DESC":"Valid iMac SN has Seagate HDD - covered by program"})
D25FP1TXXXJT iMacHDCheck.response({"ERROR_CODE":"E07","ERROR_DESC":"Valid iMac SN with NO Seagate HDD"})
QP6481XXXUW iMacHDCheck.response({"ERROR_CODE":"E02","ERROR_DESC":"Serial ID is not iMac."})


10.7.4: Return of partial volume and brightness shortcuts

Yes folks, the shorcuts for partial volume and brightness are back in 10.7.4! After users had grown to love and know Option-Shift-Volume Key and Option-Shift Brightness Key in previous versions  of OS X (10.4, 10.5, and 10.6), Apple yanked the rug out from under users with 10.7. Well, now 9 1/2 months later they are finally back. Rejoice.

Now start filing those bug reports for the insane amounts of inactive memory being used and not released to Free… :/

Apple’s New Epoch Time for WebComponentsLastUsed

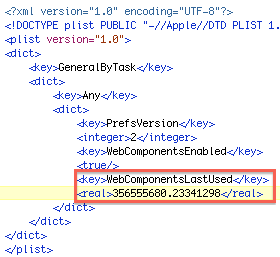
The latest Java update for Lion 2012-003 ( which after 3 revisions is still called JavaForOSX-1.0 in Software Update – oh, Apple! But I digress…) will turn off Java if it hasn’t been used in 30 days (or so I hear). It accomplishes this by writing a value to the WebComponentsLastUsed in ~/Library/Preferences/ByHost/com.apple.java.JavaPreferences.UUID.plist.

It used to be enough to have WebComponentsEnabled set to True, but now WebComponentsLastUsed is required or the unclickable “Plugin-Disabled” button will be shown in Safari’s lower right corner (it totally looks clickable yeah?)

If you work at a company that requires Java web components to be on for things like timesheets, making sure Java stays on helps to avoid getting help desk calls.

So I needed to figure out how this value was computed, it was too small to be the Unix epoch (seconds since January 1, 1970), so I did some sleuthing, some comparitive analysis (just to sound fancy), and figured out it is the number of seconds since January 1, 2001. To get this value you just need to get the Unix epoch and subtract the number of seconds since Jan 1, 2001.

Here’s the way to get this value in a BASH Terminal:

echo $(( $(date "+%s") - 978307200 ))

Toggling the check box in /Applications/Utilities/Java Preferences will reset the WebComponentsLastUsed value and you will find it very close to the value from Terminal.

Wasn’t that fun? The Der Flounder blog has a script using this method to turn on Java. He was a good sport to incorporate my code, too. He enlightened me with his UUID scripting code, so share and share alike, I say.

Bonus link for Apple’s other epoch time, for iTunes’ XML Play Date field: January 1, 1904 – that’s the first year of the last century with a leap year, so says Filemaker! ;)

Update / Create Lion RecoveryHD Partition Quickly Without Reinstalling

April 6, 2015 UpdatecreateRecoveryHDUpdater 15.4.6.command – built PKG now is targetable to volumes other than /

Feb 28, 2015 Update: New script on Software page and here:
createRecoveryHDUpdater 15.2.28.command

Apple released the Lion Recovery Update in October, 2011, and, after they updated the Lion recovery partition to 10.7.2, there was a great hint from Clay Caviness who dug into the update and highlighted the the relevant files and commands that it used to accomplish this update.

Recently, 10.7.3 came out, however, and the RecoveryHD partition is not updated if you use Software Update; it will stay at 10.7.2. This is probably not a big deal, as Apple didn’t deem it necessary to update, but for some users, this may not be good enough.

Note: Running the full 10.7.3 installer from the App Store will update the partition; this is fine for your home computer but not practical for large deployments.

Script Workflow:

  • Asks for locations of Recovery Update, Install OS X Lion.app, and destination
  • Expands and collects the dmtest tool from the Lion Recovery Update
  • Collects the hidden Basesystem chunklist and dmg found in the InstallESD.dmg inside “Install Mac OS X Lion.app”
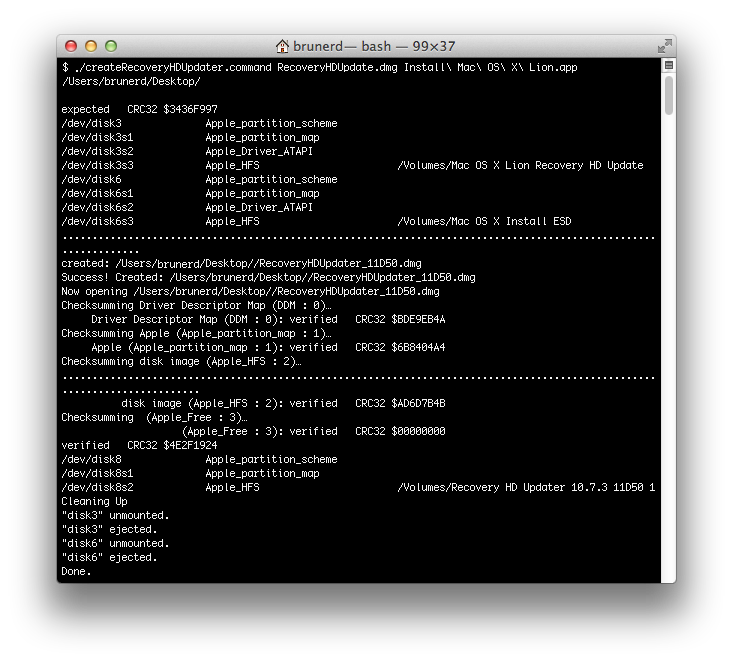
The script making the Disk Image
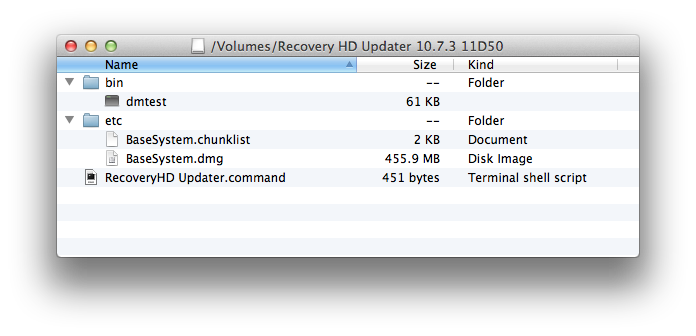
  • Puts it all neatly into a self-contained disk image along with the script RecoveryHD Updater.command which can be used to easily create or update the RecoveryHD partition, even on the disk you are currently booted from; don’t worry dmtest takes care of all the logic to create or update.
The final disk image

Requirements:

  • Download the latest version of Install OS X Lion.app. Option-click the Purchases tab in the App Store and you will be able to “Install” (download) the latest version available
  • Download Lion Recovery Update from Apple

Script Tip:

Copy and paste the script into TextWrangler, save with a .command extension and it will automatically set the executable bit.

createRecoveryHDUpdater.command (downloadable script):

#!/bin/bash

#this script will make a disk image with the tools needed to update your Recovery HD with the newest OS X Lion release

#Required components:
#Lion Recovery Update v1.0 - http://support.apple.com/downloads/DL1464/en_US/RecoveryHDUpdate.dmg
#"Install Mac OS X Lion.app" - App Store

###########################
# RecoveryHD Updater.command
###########################

#this script that will be saved to the disk image that is created
RecoveryHDUpdaterScript='#!/bin/bash
clear;
MYPATH="$(dirname "$0")"

#get destination drive
if [ "$1" == "" ]; then
echo -n "Please drag in DESTINATION disk for Recovery HD partition and press Enter: "
while [ -z "$DEST" ]; do
read DEST
done
if [ ! -d "$DEST" ]; then echo "$DEST not found"; exit; fi
else
DEST="$1"
fi

#create Recovery partition
sudo "$MYPATH"/bin/dmtest ensureRecoveryPartition "$DEST" "$MYPATH"/etc/BaseSystem.dmg 0 0 "$MYPATH"/etc/BaseSystem.chunklist
'
######
# END
######

###########################
# VARIABLES
###########################

#IMAGETEMP is the pathname for the disk image being built, will the OS and Build appended to the name later
IMAGETEMP="/tmp/Recovery HD Updater"

#temp folder for package expansion
RECOVERY_EXPANDED="/tmp/RecoveryHDUpdate"

#Mounted disk image paths
ESDPATH="/Volumes/Mac OS X Install ESD"
RECOVERYPATH="/Volumes/Mac OS X Lion Recovery HD Update"

#############
# MAIN SCRIPT
#############
clear;
#get Recovery Update dmg path
if [ "$1" == "" ]; then
echo -n "Please drag in RecoveryHDUpdate.dmg and press enter: "
while [ -z "$RECOVERYHDUPDATE" ]; do
read RECOVERYHDUPDATE
done
if [ ! -f "$RECOVERYHDUPDATE" ]; then echo "$RECOVERYHDUPDATE not found"; exit; fi
else
RECOVERYHDUPDATE="$1"
fi

#get Lion Installer path
if [ "$2" == "" ]; then
echo -n "Please drag in \"Install Mac OS X Lion.app\" and press enter: "
while [ -z "$LION" ]; do
read LION
done
if [ ! -d "$LION" ]; then echo "$LION not found"; exit; fi
else
LION="$2"
fi

#get destination path for disk image to be created at
if [ "$3" == "" ]; then
echo -n "Please drag in Destination folder for disk image: "
while [ -z "$DEST" ]; do
read DEST
done
if [ ! -d "$DEST" ]; then echo "$DEST is not a valid path"; exit; fi
else
DEST="$3"
fi

#mount Recovery Update image
hdiutil attach "$RECOVERYHDUPDATE"

#expand packge inside to temp folder (contains dmtest)
pkgutil --expand "$RECOVERYPATH"/RecoveryHDUpdate.pkg "$RECOVERY_EXPANDED"

#if we were using what's inside the chunklist and recovery inside the update we would mount this
#RecoveryHDMeta="/Volumes/Recovery HD Update"
#hdiutil attach "$RECOVERY_EXPANDED"/RecoveryHDUpdate.pkg/RecoveryHDMeta.dmg

#open Lion install ESD image for the newest files
hdiutil attach "$LION"/Contents/SharedSupport/InstallESD.dmg

#get OS version from Lion Installer ESD
OSVER=$(defaults read "$ESDPATH"/System/Library/CoreServices/SystemVersion ProductUserVisibleVersion)
OSBUILD=$(defaults read "$ESDPATH"/System/Library/CoreServices/SystemVersion ProductBuildVersion)

#append info to path so disk image volume name is informative and useful
IMAGETEMP="$IMAGETEMP $OSVER $OSBUILD"

#make work the folder
mkdir -p "$IMAGETEMP"/etc/
mkdir "$IMAGETEMP"/bin/

#copy dmtest to IMAGETEMP
if [ -f "$RECOVERY_EXPANDED"/RecoveryHDUpdate.pkg/Scripts/Tools/dmtest ]; then
cp "$RECOVERY_EXPANDED"/RecoveryHDUpdate.pkg/Scripts/Tools/dmtest "$IMAGETEMP"/bin/
else
echo "$RECOVERY_EXPANDED/RecoveryHDUpdate.pkg/Scripts/Tools/dmtest not found, exiting"
exit 1
fi

#copy the BaseSystem dmg and chunklist to destination/etc
if [ -f "$ESDPATH"/BaseSystem.chunklist -o -f "$ESDPATH"/BaseSystem.dmg  ]; then
cp "$ESDPATH"/BaseSystem.chunklist "$ESDPATH"/BaseSystem.dmg "$IMAGETEMP"/etc/
#unhide BaseSystem
chflags -R nohidden "$IMAGETEMP"
else
echo "$ESDPATH/BaseSystem* not found, exiting"
fi

#put script in folder root
echo "$RecoveryHDUpdaterScript" > "$IMAGETEMP"/"RecoveryHD Updater.command"
#set permissions
chmod ugo+x "$IMAGETEMP"/"RecoveryHD Updater.command"

#create disk image from folder
hdiutil create -srcfolder "$IMAGETEMP" "$DEST"/RecoveryHDUpdater_$OSVER_$OSBUILD.dmg
if [ $? -eq 0 ]; then
echo "Success! Created: $DEST/RecoveryHDUpdater_$OSVER_$OSBUILD.dmg"
echo "Now opening "$DEST"/RecoveryHDUpdater_$OSVER_$OSBUILD.dmg"
hdiutil attach "$DEST"/RecoveryHDUpdater_$OSVER_$OSBUILD.dmg
else
echo "Disk Image failed"
fi

echo "Cleaning Up"
#delete temp folders
rm -rf "$IMAGETEMP" "$RECOVERY_EXPANDED"

#eject the volumes
hdiutil eject "$RECOVERYPATH"
hdiutil eject "$ESDPATH"

echo "Done."

exit

The script can also be run with command line arguments:

$ ./createRecoveryHDUpdater.command [Recovery Update DMG] [Install Lion App] [Destination for DMG]

As well as the script that is put in the created disk image:

$ ./RecoveryHD\ Updater.command [Destination]

Otherwise just double-click it in the Finder and it will ask you for the files and paths which you can just drag into the Terminal window and press Enter (don’t worry about the trailing spaces it adds)

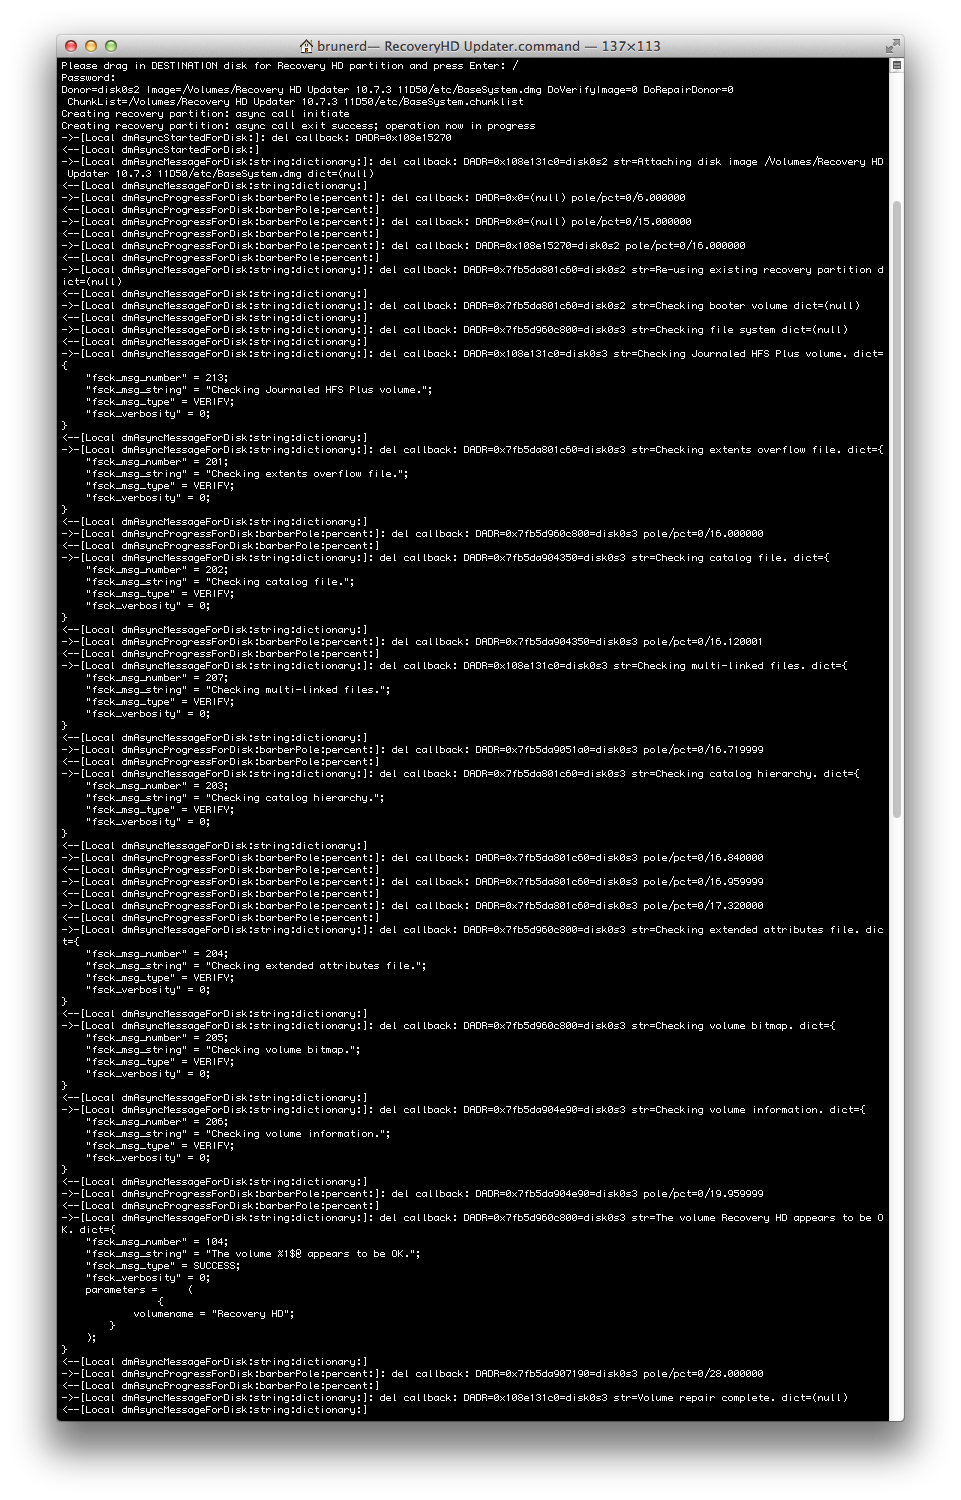
When you run the script in the disk image you will be prompted for an admin password and away it goes, with all sorts of ugly output because it never thought a human would gaze upon it’s hidden ways…

dmtest updating the RecoveryHD partition


Update: Just tested with 10.7.4 and this script still works correctly, nothing has changed in the structure of the updated Install OS X Lion.app from the App store, note that the 10.7.4 installer is version 1.0.21 (10.7.2=1.0.13 and 10.7.3=1.0.16)

Update: Script will work on 10.8 without modification, however I have updated the script anyway to be a bit quieter when mounting the various DMGs, to accept tilde paths, accept the RecoveryHDUpdater as either a DMG or PKG, and changed prompt phrasing to include Mountain Lion.

Getting and setting PPD options via command line for use with lpadmin in OS X

UPDATE – Script now will convert CR to LF line endings for better reliability with old PPDs

There are some good hints for adding printers via the command line with lpadmin: Managing multiple printers via the command line

However, there is still confusion surrounding the setting of printer options from the command line, as a poster to Debian bugs pointed out back in 2006: lpoptions documentation doesn’t. After doing some testing, here’s the two main takewaways:

  • If you use lpadmin and specify options with “-o” the PPD is altered and OS X will recognize the options for the printer.
  • However, if you setup the printer using lpadmin without any options and later use lptoptions to set the options, they are not written to the PPD and the GUI is unaware of the printer’s options.

more helpful hints about lpadmin and lpoptions:

lpoptions -p printername -l

  • Prints PPD options, “Default” is filtered out from option name (compared to looking at the raw PPD)
  • It uses a colon when reporting key value pairs, however replace that with an equals sign when specifying an option
  • The option name stops at the first slash
  • Example: The duplex option for HP printers will output like this “HPOption_Duplexer/Duplex Unit: *True False”
    When specified as a “-o” option it would be “HPOption_Duplexer=True”

lpadmin … -o this=that

  • Alters the ppd that is placed in /etc/cups/ppd/ when the printer is installed

Unhelpful things:

lpoptions -p printername

  • These are NOT the PPD options you want to set

lpoptions -o

  • Only writes options to: /private/etc/cups/lpoptions (run with sudo) or ~/.cups/lpoptions (run as current user), GUI apps are unaware of these options


The following script compares the original and the newly installed PPD to generate the options syntax to be used with lpadmin: 

The main magic in this script is a little diff and sed:

diff "$originalfile" "$newfile" | grep "> [*]Default" | sed 's/> [*]Default/-o /g' | sed 's/: /=/g'

Script Workflow

  • Copy and paste the script into TextWrangler (or download ppdOptionsDiff.command), save with a .command extension and it will automatically take care of the executable bit
  • Setup your printer via the Printers Preference Pane in the GUI.
  • Look in /etc/cups/ppd and find the newest .ppd (it will be named as the printer)
  • Locate the original .ppd.gz (or .ppd) in /Library/Printers/PPDs/Contents/Resources/, usually the printer ppd is easily found by name, but some like Canon have some cryptic filenames, so look inside the /etc/cup/ppd file, the “PCFileName” variable sometimes helps to determine the file name
  • Run the script given below, it will ask you to drag in the original and the modified ppds. Out will come the “-o” options for use with lpadmin

You can also run the script with the original and modified file paths as arguments and the string will be output

The script “ppdOptionsDiff.command“:

#!/bin/bash
[ -f /tmp/debug ] && set -x
#ppd option maker

#help
if [ "$1" == "-h" ]; then
	echo "$(basename $0) compares two ppds and outputs the differences as a string for use in lpadmin"
	echo "Usage: $(basename $0) [original_ppd] [new_ppd]"
	exit
fi

#check for parameter if not ask
if [ -z "$1" -o -z "$2" ]; then
	clear;
	echo "Drag in the unmodified PPD from /Library/Printers/PPDs/Contents/Resources:"
	open /Library/Printers/PPDs/Contents/Resources
	while [ -z "$originalfile" ]; do
	read originalfile
	done

	echo "Drag in the PPD from /etc/cups/ppd:"
	open /etc/cups/ppd
	while [ -z "$newfile" ]; do
	read newfile
	done
#else just take the arguments
elif [ -n "$1" -o -n "$2" ]; then
	newfile="$2"
	originalfile="$1"
fi

#make a temp file of the original to compare
#strip off path and extension for temp file name
tempOriginalFile="/tmp/$(basename "$originalfile" .gz)"

#if file is compressed expand
if [ "${originalfile##*.}" == "gz" ]; then
	#uncompress
	IFS=$'\n\t'
	#gunzip to temp file
	gunzip < "$originalfile" > "$tempOriginalFile"
else
#just make a copy
cp "$originalfile" "$tempOriginalFile"
fi

#change line endings from CR to LF (diff fails unless this is done)
sed -e $'s/\\\r/\\\n/g' -i '' "$tempOriginalFile"

#make a temp file of the new file to compare
#strip off path
tempNewFile="/tmp/$(basename "$newfile")"
cp "$newfile" "$tempNewFile"

#change line endings from CR to LF (diff fails unless this is done)
sed -e $'s/\\\r/\\\n/g' -i '' "$tempNewFile"

#test for file existence
if [ ! -f "$tempOriginalFile" ]; then echo "$tempOriginalFile is not a valid path"; exit; fi 
if [ ! -f "$tempNewFile" ]; then echo "$tempNewFile is not a valid path"; exit; fi 

#create options list by diffing and filtering
optionList=$(diff "$tempOriginalFile" "$tempNewFile" | grep "> [*]Default" | sed 's/> [*]Default/-o /g' | sed 's/: /=/g')

#print out the options with no line breaks
IFS=$'\n\t'
if [ ! -z "$optionList" ]; then
	for option in $optionList; do 
		echo -n "$option "
	done
	echo
else
	echo "No differences"
fi

#delete the temp filess
rm "$tempOriginalFile" "$tempNewFile"

exit

Example (with pathnames provided as arguments, otherwise runs in interactive mode):

$ ./ppdOptionsDiff.command /Library/Printers/PPDs/Contents/Resources/HP\ LaserJet\ 5200.gz /private/etc/cups/ppd/PRINTERNAME.ppd

-o HPOption_Tray3=Tray3_500 -o HPCollateSupported=True -o HPOption_Duplexer=True -o HPOption_Disk=RAMDisk

Use the generated string in lpadmin to set the printer options, like this example:

lpadmin -p "Ye_Olde_LaserJet" -D "Ye Olde LaserJet" -E -v socket://x.x.x.x -P /Library/Printers/PPDs/Contents/Resources/HP\ LaserJet\ 5200.gz -L "Location is in a closet in a sub-basement, good luck" -D -o HPOption_Tray3=Tray3_500 -o HPCollateSupported=True -o HPOption_Duplexer=True -o HPOption_Disk=RAMDisk -o printer-is-shared=false

The documentation from man lpadmin is a bit obtuse and lacking. For example: -E will enable the printer (essential!) except when used before -p or -d in those cases it forces encryption, so watch out! Also, in the man page it shows -h server[:port] but -h is not documented anywhere in there and I have never used it. Rather, the -v option should be used with a URL like lpd://, socket:// (HP), ipp://, etc.. if you want to get a listing of the protocols run lpinfo -v this will even do a look around with Bonjour to see what’s on the network (they are dnssd://). The -p option is the CUPS queue name, it does not allow spaces, whereas the -D option is the “friendly name” that a user will see in macOS, you can set some location text with -L and finally just tack all the -o options on the end. -o printer-is-shared=false will keep the printer from being broadcast if you turn on Printer Sharing (or if a user accidentally turns it on)

Make a Snow Leopard 10.6.7 Installer Disc from a Mac Restore Disc

So there was this hint the other day at MacWorld’s OS X Hints site:
10.6: Make a universal 10.6.7 Snow Leopard installer – Mac OS X Hints

It was a very useful hint for hacking together a retail Snow Leopard disc (10.6.0/10.6.3 ) and the newest system specific restore disc (10.6.7 for iMacs and MacBook Pros) to make a “universal” 10.6.7 disc that would work on new and old machines alike, that are qualified to run Snow Leopard. Useful not only for techs who need a one disc does it allbut others who might lack bandwidth for updates since this cuts down on some Software Update downloads (10.6.8 is only a smaller “delta” update this way.)

So, it was a good hint because it got to the heart of the matter, that OSInstall.mpkg was where the script logic determines if your machine is qualified for the restore. However using the original 10.6 disc and copying over all the old printer drivers is a little too kludgy for me, the less donethe better. I knew there had to be a more elegant way…

Voila – this bash script strives for automagic: it reads in your restore disc, prompts you to grab your disc and pop in a blank DVD, then modifies the install logic, and burns the disc you can use on all your Snow Leopard elligible Macs (P.S. Don’t steal OS X). It hasn’t been QC’d or QA’d beyond a few runs using one set of 10.6.7 restore disc, but I hope it comes in handy for some Mac tech out there somewhere who is in a pinch and needs to restore Snow Leopard – if only to get App Store on a machine and then up to 10.7 or 10.8!

makeUniversalSnowLeoDisc.command

#!/bin/bash
clear

destination=~/Desktop/Mac\ OS\ X\ Install\ DVD

#make destination folder
[ ! -d "$destination" ] && mkdir "$destination"

#make sure disc is in drive
while [ ! -d /Volumes/Mac\ OS\ X\ Install\ DVD ] ; do
echo Please insert Mac OS X Install DVD and press Enter
read
done

#get device node for block copy
device=$(diskutil info /Volumes/Mac\ OS\ X\ Install\ DVD/ | grep Node | cut -f2 -d:)

#create disk image from device (retains Finder window custom background)
echo "Creating Disc image at $destination, please wait..."
/usr/bin/hdiutil create -srcdevice $device -format UDRW "$destination"/Mac\ OS\ X\ Install\ DVD.dmg

#disk image using source folder (loses custom Finder background)
#/usr/bin/hdiutil create -srcfolder /Volumes/Mac\ OS\ X\ Install\ DVD/ -format UDRW "$destination"/Mac\ OS\ X\ Install\ DVD.dmg

#eject media
/usr/bin/drutil eject

#tell user to take out disc
echo -e $'\a'$'\a'$'\a'$'\n'"Please Remove the disc and press Enter"$'\n'
read

echo "Modifying Image"
#mount r/w image
hdiutil attach "$destination"/Mac\ OS\ X\ Install\ DVD.dmg

#expand OSINstall.mpkg
/usr/sbin/pkgutil --expand /Volumes/Mac\ OS\ X\ Install\ DVD/System/Installation/Packages/OSInstall.mpkg /Volumes/Mac\ OS\ X\ Install\ DVD/System/Installation/Packages/OSInstall.expanded

#modify Distribution script in place with no backup
/usr/bin/sed -i '' "s/modelProp\ \=\=\ hwbeSupportedMachines\[i\]/1/g" /Volumes/Mac\ OS\ X\ Install\ DVD/System/Installation/Packages/OSInstall.expanded/Distribution

#modify Distribution script in place with backup (for sissies)
#/usr/bin/sed -i '.original' "s/modelProp\ \=\=\ hwbeSupportedMachines\[i\]/1/g" /Volumes/Mac\ OS\ X\ Install\ DVD/System/Installation/Packages/OSInstall.expanded/Distribution

#remove original OSInstall.mpkg package
/bin/rm -rf /Volumes/Mac\ OS\ X\ Install\ DVD/System/Installation/Packages/OSInstall.mpkg

#flatten new package
/usr/sbin/pkgutil --flatten /Volumes/Mac\ OS\ X\ Install\ DVD/System/Installation/Packages/OSInstall.expanded /Volumes/Mac\ OS\ X\ Install\ DVD/System/Installation/Packages/OSInstall.mpkg

#remove expanded folder
/bin/rm -rf /Volumes/Mac\ OS\ X\ Install\ DVD/System/Installation/Packages/OSInstall.expanded

### image is now ready to be burned ###

#eject disk image
hdiutil eject /Volumes/Mac\ OS\ X\ Install\ DVD/

#burn disc image
/usr/bin/drutil burn "$destination"/Mac\ OS\ X\ Install\ DVD.dmg

echo -e $'\a'$'\a'$'\a'$'\n'"Disc Complete, Please Remove the disc"$'\n'

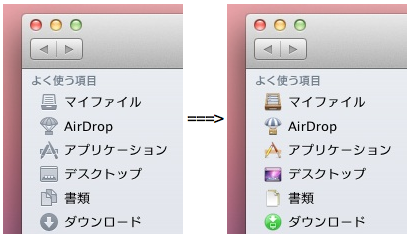
Lion’s grey sidebar is a Jedi mind trick

These aren't the files you're looking for...

And a poor attempt at a Jedi mind trick at that. With the now grey and lifeless sidbar in Lion Apple is trying to visually say: “these aren’t the files or folders you’re looking for”. It’s as if they want us to become so turned-off to this grey apocalyptic version of the sidebar that we yearn for iCloud where our data lives in the apps and those pesky file and folder structures cease to have any relevance in our workflow.

Reality check Apple, you won’t change our habits overnight, nor overturn what is a completely valid way of working with your computers.  You will not endear us to the iCloud experience by also crippling the Finder’s look and feel. Although I do thank you for returning the ability to have large icons in the sidebar, which you took away in 10.5, the grey-ification of the icons and the exile of Devices to the bottom of the list has truly hobbled any usefulness the Finder had. Oh, add the fact that mounted volumes no longer show as a Device, but rather you have to add them manually to favorites has also irked me. Why should I have to open up Shared, click the server then find the volume I want. It’s ridiculous when you couple that with having the default Finder behavior to not show mounted volumes on the desktop. Fine you hate files, folders and drives, we get it, but not all of us agree… “the rest of us”, as it were.

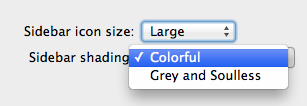
Here’s a compromise I could live with Apple:

At least give us a choice Apple!

Thankfully, a very bright Mac developer has made a plugin to return color to the Finder sidebar. Now I normally do not like using SIMBL plugins because code injection and method swizzling makes me nervous. But having color on the sidebar is worth it. You can find all the info for doing this at OS X Daily along with installation tips.

Colorful Sidebar by CVZ

So, file those Bug Reports with Apple and let them know their Jedi mind trick isn’t going to work. These are the files and folders we’re looking for and color would greatly help us find them. (I’d consider this a regression fix rather than a feature request.)

Postscript on (not) using Finder:
A quick note for the purists out there who don’t even run Finder. You intrepid folks take a road less travelled but not one that not everyone wants to embark down. Now, Rick of Rixstep will argue that Finder is an and abhorrent holdover from OS 9 that should have gotten the axe or at the least been completely recoded into 100% Cocoa, all of its Carbon cruft put out to pasture, its very existence is retarding OS X, and to run Finder on your system is akin to self-trepanation. OK — fair enough actually on most points! :D However, until someone else comes along with a Finder replacement that is 100% Cocoa and has full feature parity, then we put up with the Finder. (And most businesses would be loathe to spend money on licenses for Finder replacements like XFile or PathFinder, it’s hard enough to get them to spend the extra dough up-front for a Mac!) Wah wah :/ So we commiserate with others on the discussion boards and plead our case to the Designers Gone Wild at Apple.