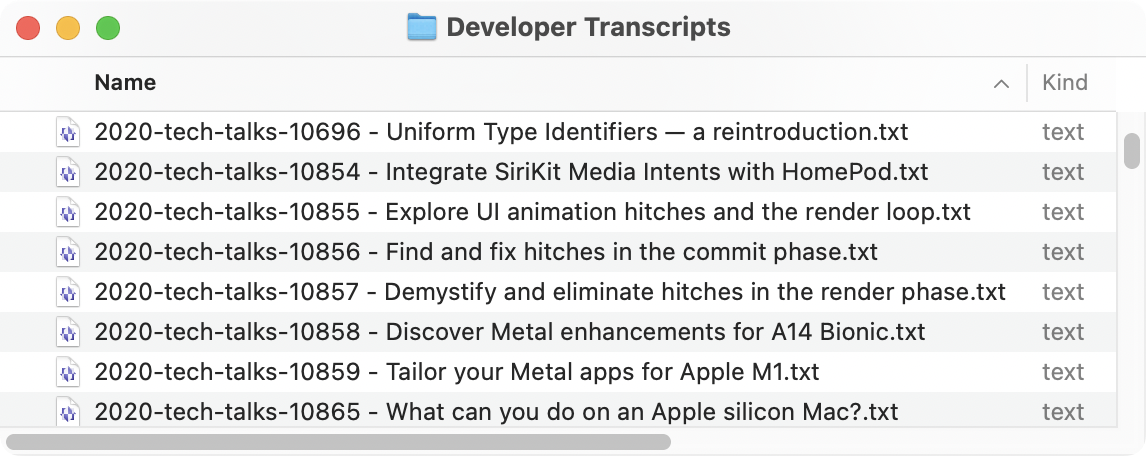
My new tool clui, pronounced “clue-ee” offers Command Line Unicode Info with the ability to export to a variety of formats like CSV, JSON, YAML, RTF and more. While I’ve written a few macOS command line tools geared to the Mac Admin like jpt the JSON power tool, ljt the little JSON tool, shui for easily adding AppleScript dialogs to your shell script, and most recently shef a Unicode text encoder and formatter for shell scripters. This is one is almost “just for fun” although you might find some practical uses for it. Writing shef opened my eyes to the stunning amount of detail and craftsmanship in macOS’ Unicode-aware fonts, which comprise not just the alphabets of the world but signs, symbols, and even Egyptian hieroglyphics! While macOS’s built-in Character Viewer does a pretty good job to group and display these characters it’s a painstakingly manual process if you want to get info on a range of characters. I hope clui makes it fun and easy to poke around the vast Unicode neighborhood.
Starting with Character Viewer
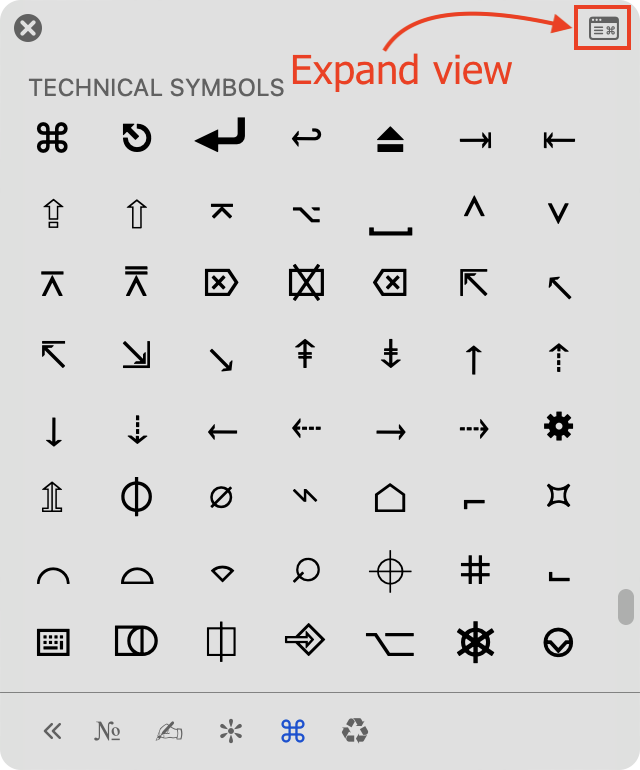
First let’s take a look at Character View, perhaps you don’t know some of it’s features. If you quickly press the dedicated “globe” 🌐 button on newer Macs (or the keyboard combo Control-Command-Spacebar on older models) it will likely open up Character Viewer in it’s default mini-sized version with preset categories along the bottom. You can click on a symbol or character and it will insert the text in your current app. The real fun begins when you click the little icon in the upper right to expand the view.
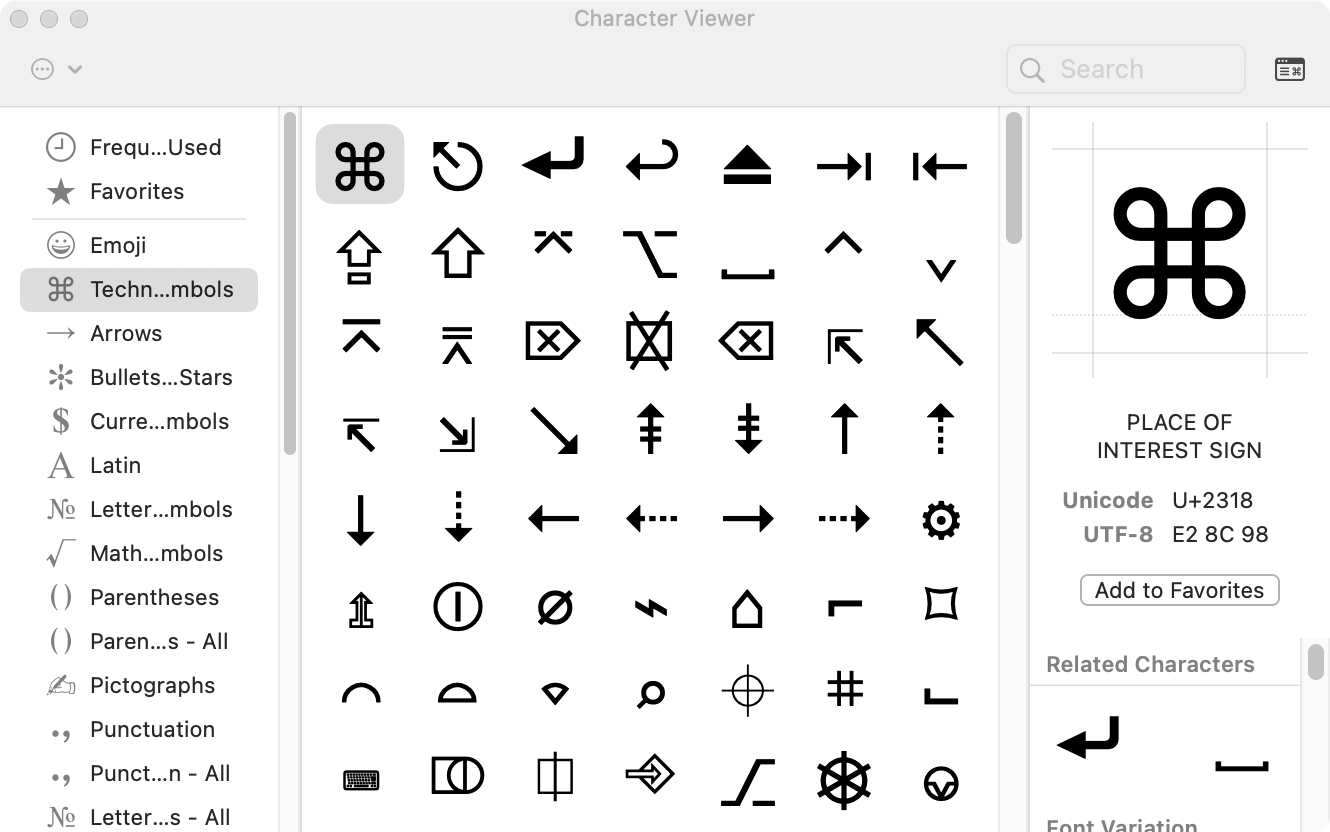
The window will expand to show more information: The code point(s) in hexadecimal (U+hhhh), the UTF-8 encoding bytes, and related characters. You will need to double-click these to insert them into your current app.
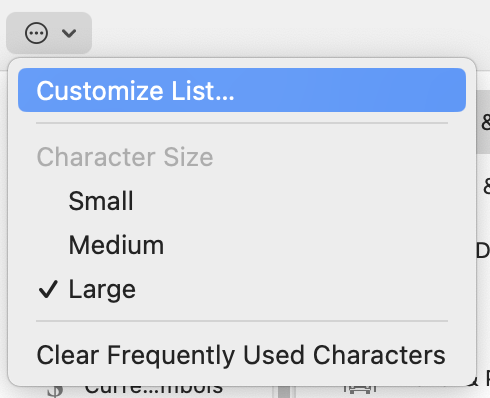
You can also Customize the List of categories that appear in the left column by clicking the encircled ellipsis…
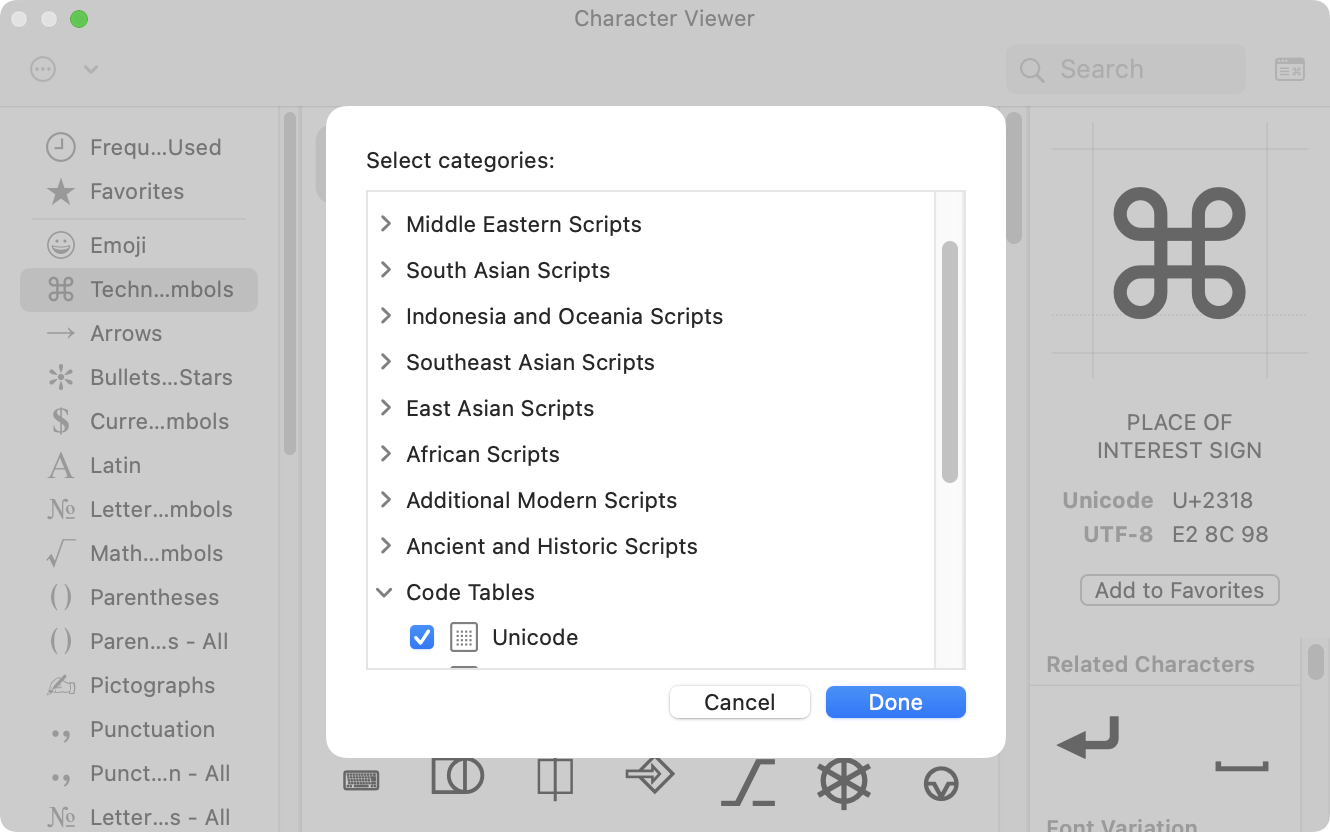
The one that has everything in it is Unicode under the Code Tables group at the bottom of the list.
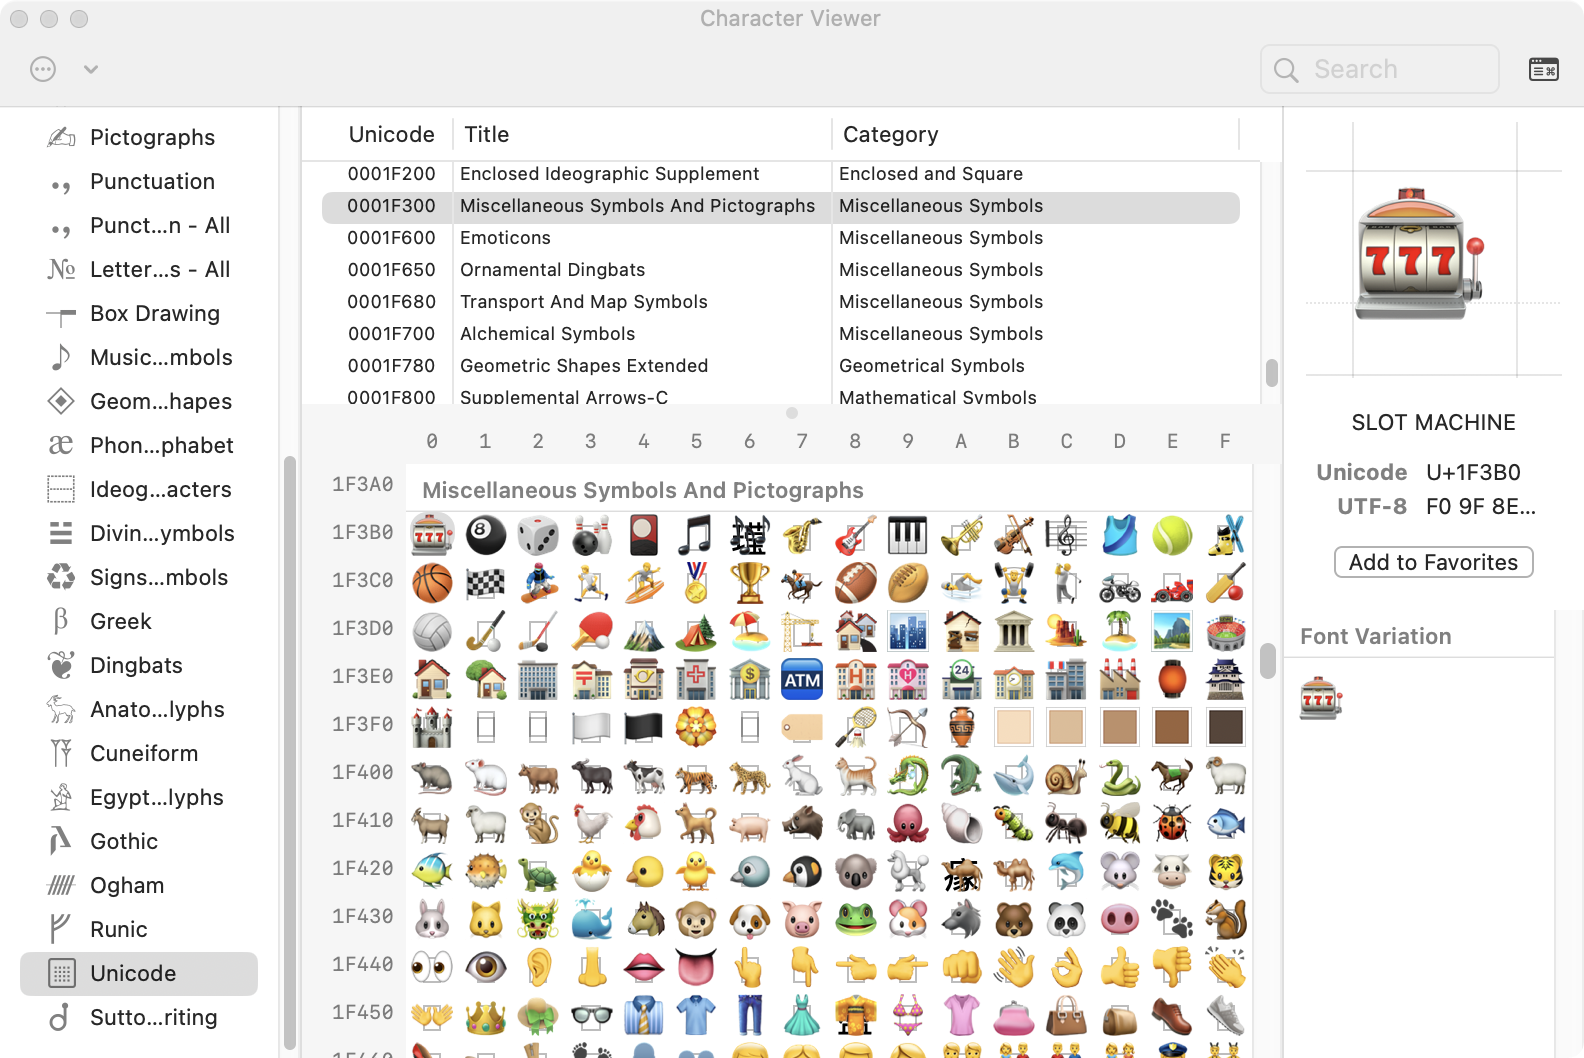
You can right-click or control-click on a character to Copy Character Info into the clipboard. In the example below, we discover that what most Mac folks would call ⌘ “Command” is also known as the “Place of Interest Sign”. Whaddya know!


This is all well and good but who’d want to do that for thousands of characters?! What if someone wanted this info at the command line? It got me thinking: There’s Got to Be a Better Way!™
Searching for the Source
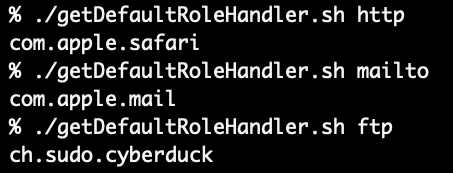
The first order of business was looking for where macOS kept it’s naming information and if it was possible to extract that information with command line tools. It ended up being in two files, a SQLite database and a plist. Here’s their full paths:
#Single code point characters and Unicode symbols
/System/Library/Input Methods/CharacterPalette.app/Contents/Resources/CharacterDB.sqlite3
#plist of single and multiple code point Emoji
/System/Library/PrivateFrameworks/CoreEmoji.framework/Versions/A/Resources/en.lproj/AppleName.strings
There is some overlap with CharacterDB.sqlite3 and AppleName.strings where Apple choose to use different phrasing for an Emoji vs. Unicodes name, but in general the former has single code point entries, while the latter has both single and the multi-codepoint Emoji sequences. clui will report on both, putting a semi-colon in between each version, you can also output discretely with the -D option. Descriptions/info fields are converted from uppercase to lowercase BECAUSE WHO LIKES GETTING YELLED AT?! 🙉 Although you can preserve case with -p which can help with deciphering the internal (and unlabeled!) columns Apple uses in the descriptions of the CJK Ideographic ranges.
clui in Action: Practical Examples
Simple Lookups
If you’d like to see what all the options and modes run clui -u to get the “usage” output, or take a look at on clui’s GitHub page. To start with, clui is built to ingest both “regular” characters and also representation of Unicode code points in hexadecimal in the style of: U+hhhhh or 0xhhhhh. Ranges can also be specified by simply adding a hyphen between to characters or codepoints and it can both ascend and descend. The default output is CSV.
For multiple code point emoji you can enclose the code point representations in quotes. Spaces within quotes are only used delimit each code point and are not part of the composite character.

The -X expansion option will display the all the code points together, then break out each component

-x will expand the input and break out each code point without showing the composite character
Working with Categories and Groups
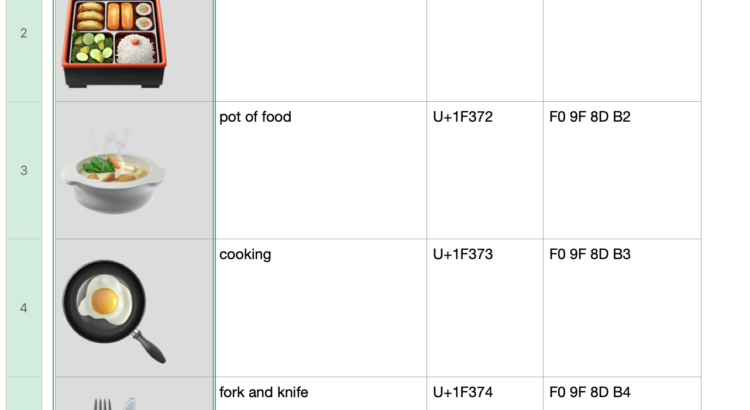
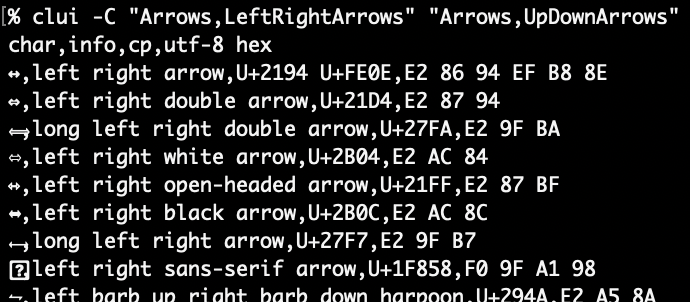
clui can tap into categories and groups by leveraging the the plists inside the Resources folder of CharacterPallette.app. These plists contain a mix of 0x code point representations and literal characters. The list option -L takes the upper and lowercase arguments of c or g for exactly what you think, categories and groups! -Lc gets categories marking those with internal subsections with an asterisk * and -LC will expand those categories to include the subsections within. All list outputs are CSV and includes a header row, -h will suppress headers. In this excerpted example below you can see Arrows contains a number of subsections:

clui acts on a categories when you use the -C option and input one or more categories. If no subsection is specified the complete category will be output. Some can be quite large and take several minutes to output! If you are outputting RTF or JSON and redirecting to a file, if you interrupt with Control-C the output will be properly closed up, so it will still be valid.
As you can see at the bottom of the list, not all characters have renderings. However, if you double click those question mark glyphs ⍰ to select and copy them (CSV is nice that way), you will get that exact character. I used the apl “quad question” character (U+2370) above to get something close to it for this example, but don’t let the generic visual representation fool you, it is unique. You can use Character Viewer to see if any other fonts have alternate graphical representations, since Terminal is using only the currently selected font to display output. Update: It will fall back to a font that has a representation if needed. I recommend the free GNU Unifont for “Glyphs above the Unicode Basic Multilingual Plane”, which fills in some of the gaps of Apple fonts (like the LCD-like segmented numbers U+1FBF0-U+1FBF9)
Groups are about the same thing as categories except groups are comprised of multiple categories. -Lg lists all groups and -LG will expand the constituent categories within.

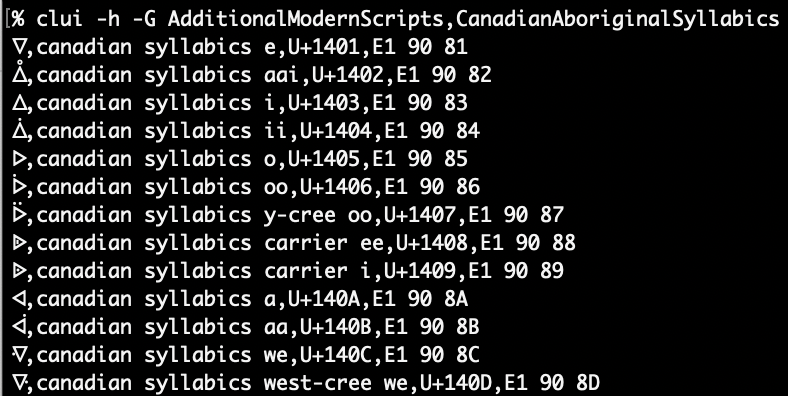
You can use -G like -C specifying one or more groups. If you include a category name (comma delimited) after the group, it’ll simply report that category as if you’d used it solely with -C. Here’s an example of the first group AdditionalModernScripts and the member category CanadianAboriginalSyllabics . For variety I’ve added -h to hide the header row from the CSV output.
CSV Looks Great in QuickLook
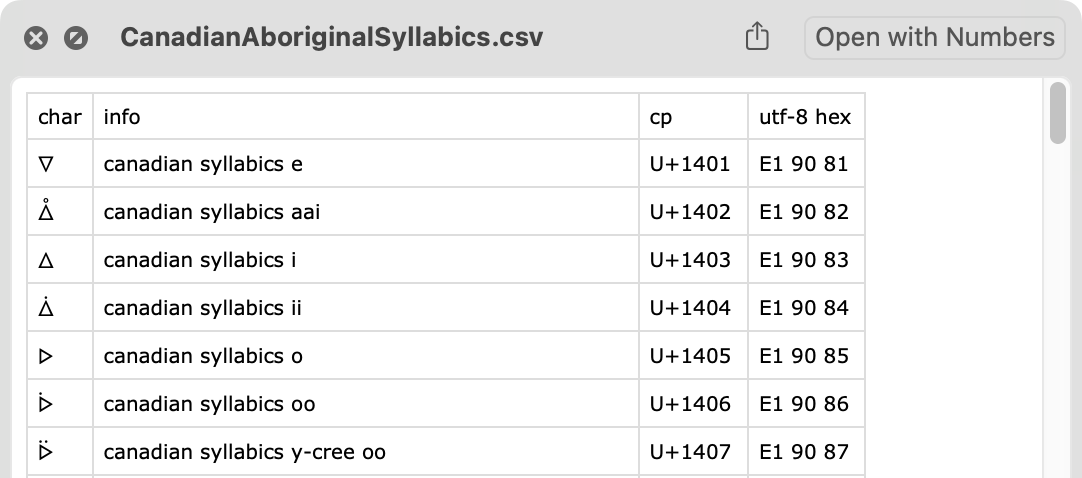
Just in case you didn’t know, Quicklook will display files with a csv extension really nicely. Here’s the CanadianAboriginalSyllabics above as seen in Quicklook, you can even select characters from within Quicklook, pretty nice!
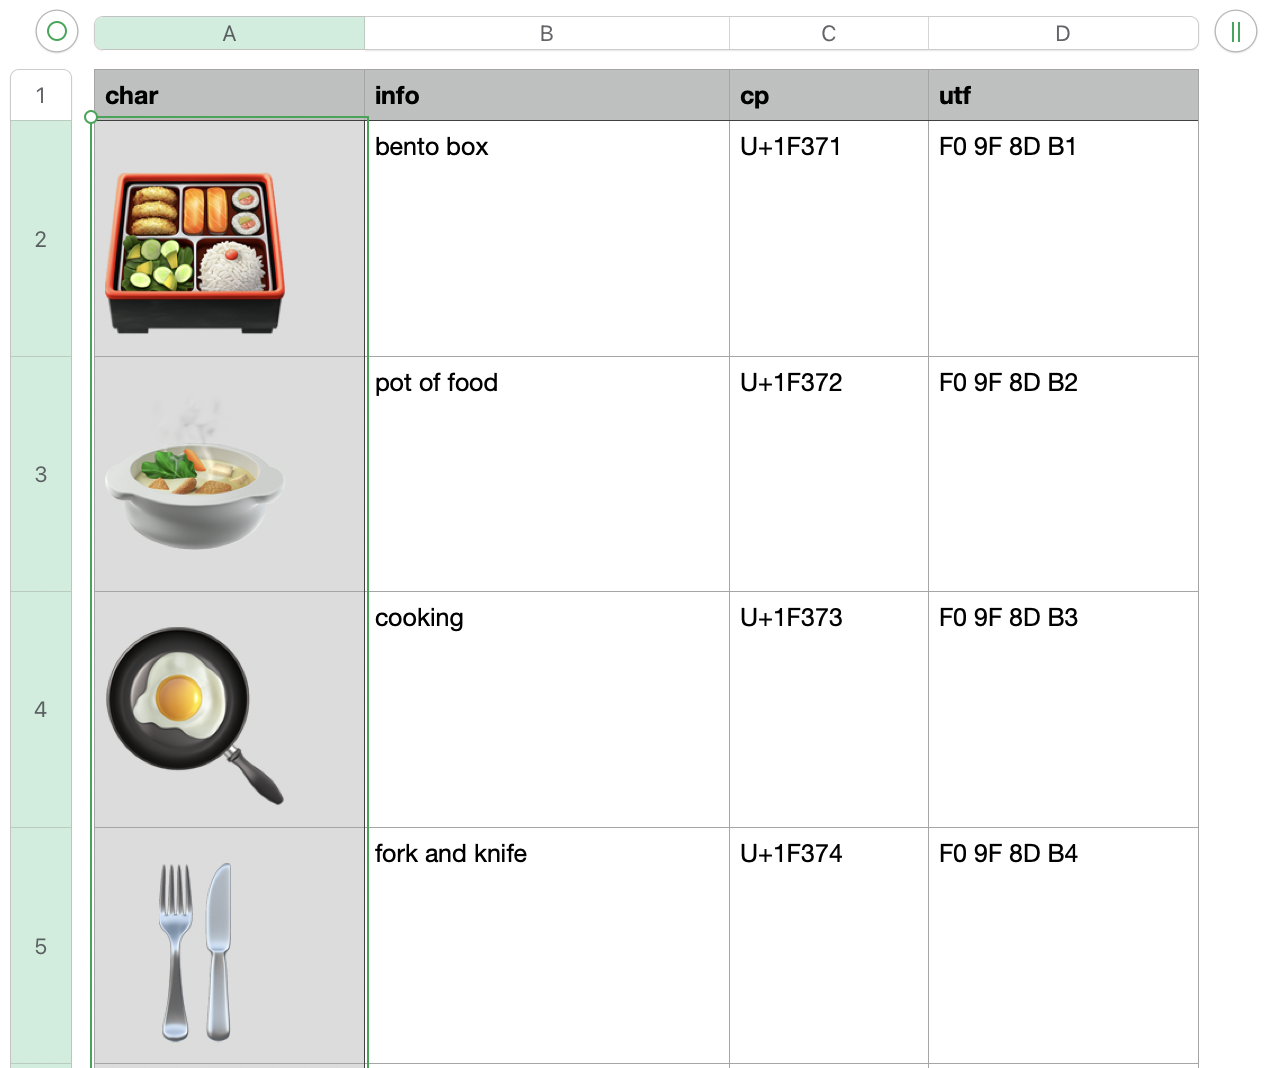
CSV Can Look Even Better in Numbers
If you want to work with CSV in Numbers it will do quite nicely. Here’s a little tip for better legibility:
- Select column A from the top of the column
- Command ⌘ click on A1 to deselect it
- Format the text to a larger size (like 50 points or higher)
- Adjust the column width a bit wider
- Save it as a .numbers file to retain formatting
Pro Tip: Quicklook will not let you select any text from a Numbers document! However if you click and drag anywhere in the Quicklook contents to the Desktop (or into Preview), it will export a seamless PDF with no page breaks! Then you can select text from the PDF in QuickLook. Who knew?! Now back to clui features!
Get a Good Look at Those Emojis in Rich Text Format!
A late entry feature to clui is RTF (Rich Text Format) output. This enables clui to present the characters in larger sizes without requiring additional work from you (as seen above in Numbers)! The format is the same as the “plain” output (-Op) which does not label the fields, simply use the -Or option
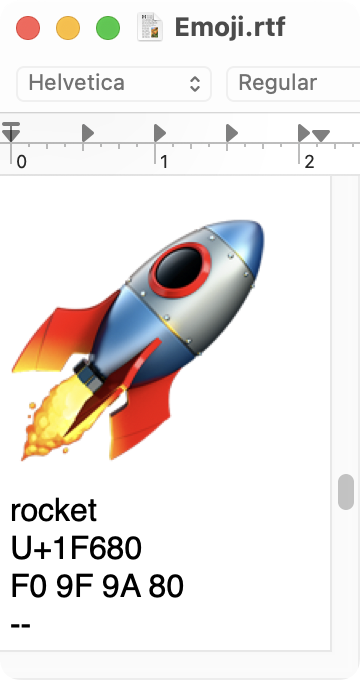
Your best bet with RTF output is to either redirect it to a file like this: clui -Or -C Emoji > Emoji.rtf or pipe it into pbcopy like so: clui -Or -C Emoji | pbcopy. There’s a neat feature in pbcopy that detects the RTF header data and allows you to paste into TextEdit as rich text. You can also specify the font sizes withthis option: -f <char size, info size>
Searching by Description
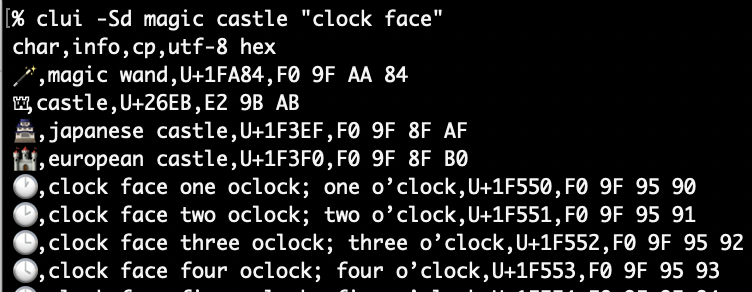
clui can also search descriptions for multiple words and phrases. In this example I’ll search for magic, castle, and “clock face” using the -Sd (search descriptions) option. If I had searched just for clock I’d have also gotten hits for “clockwise arrows” since it search for substrings.
Searching by Character
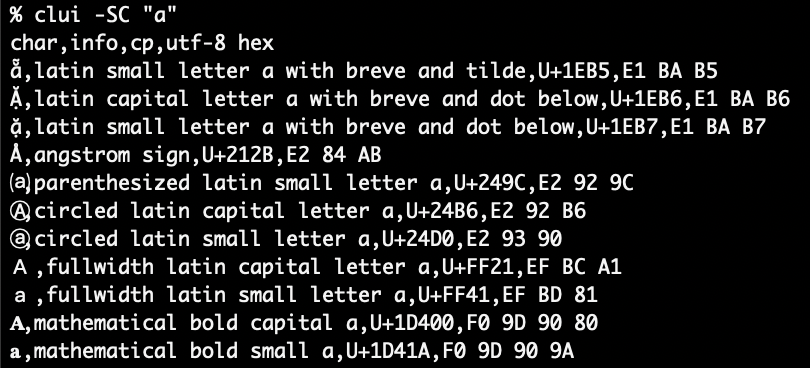
Now, if you search for the usage of a single alphabetical character you’ll probably get one hit but macOS also has a database of “related characters” which are similar look-alike letters. You know, like the Subject lines of spam: “𝔅𝗢𝔾𝕆 𝐒𝖆𝓵𝙚 ‼”. Let’s use -SC to search for "a" plus related characters. I’ve trimmed the output to get some of the more interesting characters in this screenshot
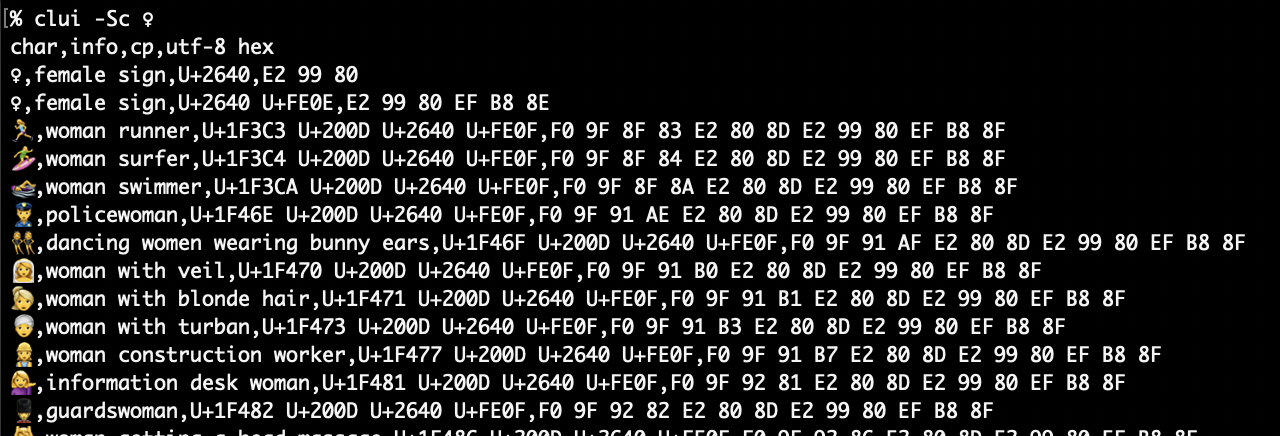
When you start searching for symbols you’ll start discovering Emojis constructed using existing symbols and zero-width joiners (ZWJ, U+200D), these are called ZWJ Sequences (and ZWJ is apparently pronounced “zwidge”) . Let’s use -Sc to search for anything with the female sign ♀.
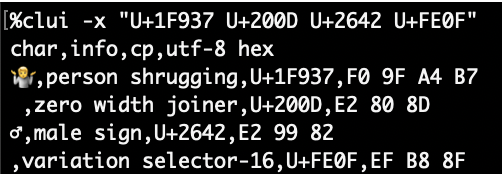
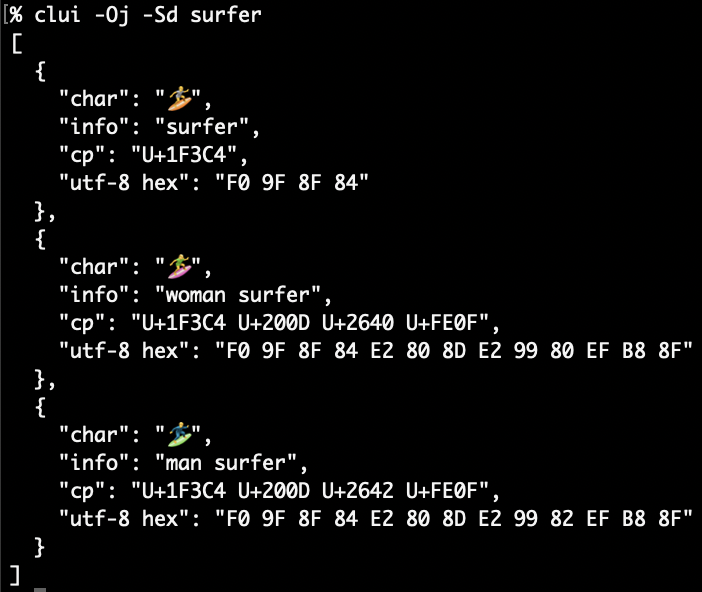
Let’s examine “woman surfer” (BTW: 100 Foot Wave Season 2 is awesome!) with the -X option to expand all component code points with the complete glyph as-is at the top:
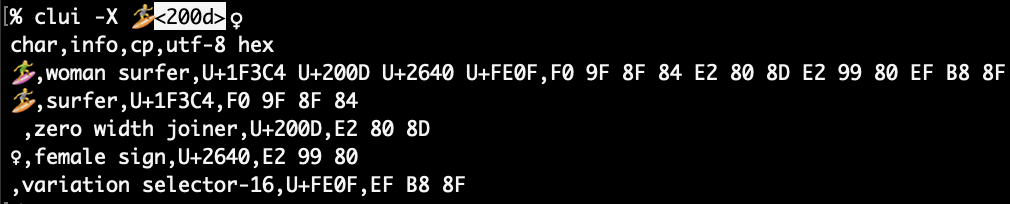
The first line has the Emoji sequence as-is, then each individual component that comprises it: a gender neutral surfer (U+1F3CF), a ZWJ (U+200D), the female sign (U+2640), and variation selector 16 (U+FE0F). You may also notice one of the quirks of Terminal: Sometimes pasted input does not fully render as a unified Emoji!
Fitzpatrick Modifiers for Skin Color
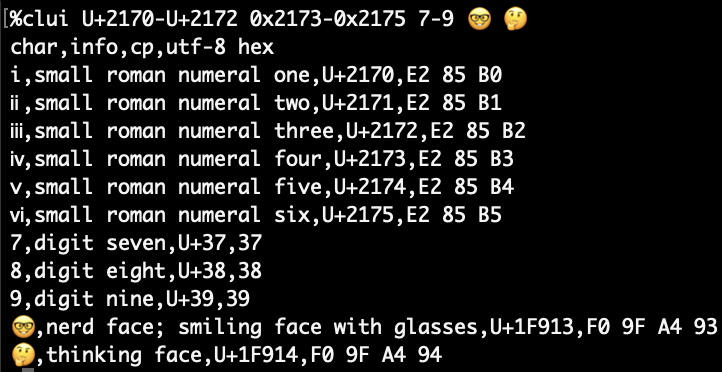
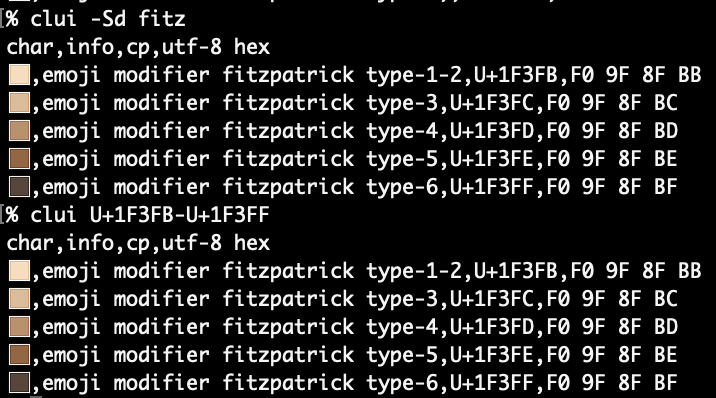
To be honest I’d never heard of the Fitzpatrick scale before working on clui! It’s simply a scale of 6 types of skin color. The Unicode modifier combines Types 1 & 2 into U+1F3FB. Let’s demonstrate a search by description and then again with their ranges. Simply specify the range using standard Unicode notiation U+hhhhh with a hyphen in between.
If you search for an Emoji with a Fitzpatrick Modifier you won’t get a hit in the databases. As a convenience clui will detect this and remove the modifier to get the description. Using the -F will also display the sequence without the modifier. We can combine it with -X for expanded output with a a summary.

As you can see the sequence without the modifier is shown, then the original sequence with the Fitzpatrick modifier then each component part: surfer, Fitzpatrick modifier type-6, a ZWJ, female sign, and a variation selector.
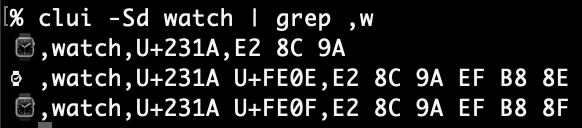
On Variation Selectors
To be honest I’d never known about variation selectors before working on this, more info on Emoji Presentation Sequences can be found here. The two most common variation selectors are pretty easy to understand: U+FE0E is “variation selector 15” and it is used to explicitly specify the text/non-graphic version and U+FE0F, “variation selector 16” gives you the emoji/graphic version. Watch (U+231A) is a good example of this. It’s at the discretion of the OS on how to render a glyph. In this case U+231A is rendered in the emoji style of an Apple Watch⌚️by default. When combined with U+FE0E, it turns into ye olde Mac OS watch ⌚︎, this is the “text version”. Adding U+FE0F does nothing to change the appearance since it was already rendered in the emoji style without it.
If you’d like to search for every character with a variation selector that is tracked in macOS’s database, you can run this query: clui -Sc U+FE0E U+FE0F A definitive list can be found here.
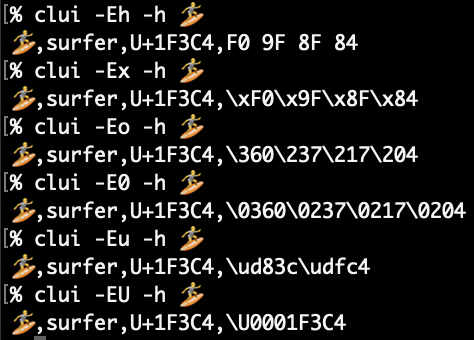
Encoding Options
So far we’ve just seen the default uppercase hexadecimal (-Eh) UTF-8 encoding. In the vein of shef, clui can output in various styles of encoding: \x hex escapes (-Ex), octal \nnn (-Eo), leading zero octal \0nnn (-E0), UTF-16 Javascript encoding (-u) and zsh style UTF-32 \U code points (-EU).
Formatting output
Besides the beautiful RTF output and functional CSV output, clui can also output characters simply space delimited, without any other data (-Oc).

JSON (-Oj) and JSON Sequences (-OJ) can be had as well. The difference between JSON and JSON Sequence is that JSON will be an array of objects, whereas JSON Sequences are JSON objects delimited with U+1E the “record separator” as ASCII calls it or “information separator two” as Unicode knows it to be and newlines. Both jq and jpt can handle JSON sequneces.
-Oj)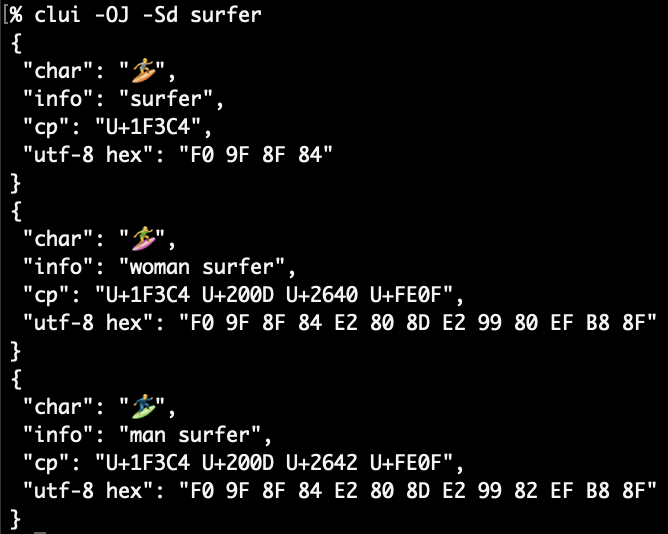
-OJ)Lastly we have YAML (-Oy) the superset cousin of JSON. My JSON string encoder jse gets some use in clui to encode strings and descriptions for these output modes.

Making it work for you (and me)
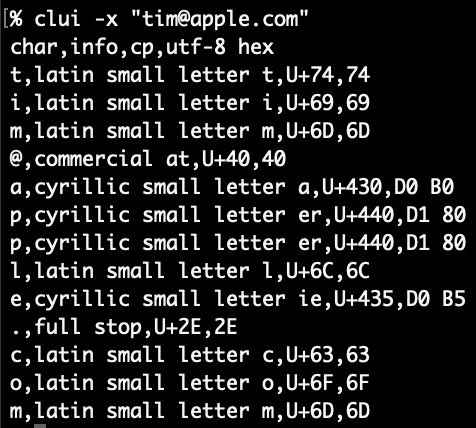
I spent a lot of time trying to make clui work in an intuitive way, it replicates the core features of Character Viewer with plenty of bonus functionality thrown in. It may not be something you use daily, but it might come in handy when you get an email from let’s say, tim@аррlе.com. You could run that string through clui in “expand” mode (-x) to analyze on each letter in the string. You might be surprised and perhaps disappointed that perhaps “Tim Apple” did not send you that email.
Or maybe you’d like to figure out the secrets of Zalgo Text or perhaps what characters are in ¯\_(ツ)_/¯ or make a catalog of Emoji in RTF: clui can do it! Head on over to the clui Github page and download the Release if you’d like to try it out on your (Monterey+) Mac, thanks!
Bonus
Since you made it down here, how about a one-liner that will create RTFs of all the Unicode categories? It will likely take several hours and will open a Finder window when finished.
#make RTFs of every Unicode category, this might take a few hours, if you want to cancel close the Terminal window
mkdir ~/Desktop/clui-rtfs; cd ~/Desktop/clui-rtfs; IFS=$'\n'; for category in $(clui -LC | grep Unicode,); do clui -Or -C "$category" > "$category.rtf"; done; open -R .