Shhh… Silverlight’s been updated for Mac
So by shear accident, I was in Windows 7 via Boot Camp today. I decided to run updates and actually look at what was being updated. I noticed there was a new Silverlight update, 5.1.20125.0, speak of the devil, in my XProtect Plugin Checker post, not long ago, I speculate when Silverlight will be blocked by Apple because of a security update. Security bulletin MS13-022 explains the critical nature of this for Windows and Mac, if you want to see an MS engineer tell you it’s Priority 1 this month you can visit the Microsoft March 2013 security update page. You’ll need Silverlight to watch the video, but don’t worry it won’t give you prompt you to update. Neither does Netflix. Apparently Microsoft haven’t pulled the trigger to alert users with old Silverlight plugins! Are they waiting for this 14.9MB package to replicate around the world to all the Akamai distribution servers or something? I think it’s done now.
Whither Thou Goest Check for Updates (or Preferences for that matter)?
So I decided to double check my auto-update settings in Silverlight. Would you like to check your Silverlight Preferences? The easy way is to Control-Click/Right-Click on Silverlight content and select About Silverlight from the menu. But take a real world example: you are at a site that won’t load it’s Silverlight content because the caches need cleaning! (This really happened to someone I had to support remotely via email).
Let’s go spelunking!
Opening Silverlight Preferences the hard way:
Navigate to /Library/Internet Plug-Ins
Control-Click on Silverlight.plugin and Show Package Contents
Navigate into Contents/Resources
Double click Silverlight Preferences.app
Or type this in at Terminal:
open /Library/Internet\ Plug-Ins/Silverlight.plugin/Contents/Resources/Silverlight\ Preferences.app
I ended up making a .command file to do this, zipped it up, and emailed it so the user could simply empty the Silverlight caches and get back to work (if this was for real work or Netflix I’m not sure…) but regardless, a Preference Pane would be kinda nice MS Silverlight dev folks! All it has to do, at bare minimum, is open this very same app inside the plugin bundle (so we don’t have to dig for it). That’s what the Oracle Java 7 prefPane does. I digress here’s my settings:
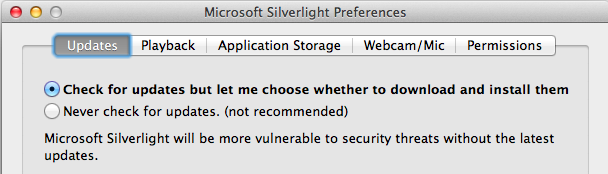
Yep that’s set…
OK so Microsoft doesn’t think this Priority 1 update needs updating yet on the Mac?
For fun, in the same folder you can run UpdatePrompt.app to see this:
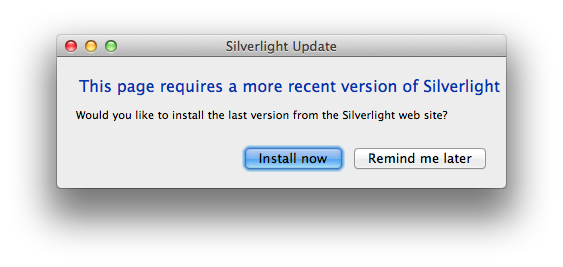
Clicking Install now launches the URL: http://go2.microsoft.com/fwlink/?LinkId=116053 which will automatically start downloading the newest version of Silverlight.
Exploring the XProtect Factor
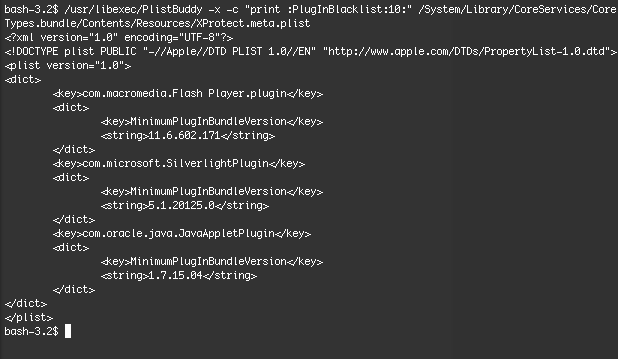
Now, I though to myself, if Microsoft doesn’t start getting people to update, I think I know what Apple’s gonna do… but they haven’t done it yet. So I did. I edited my XProtect.meta.plist and blocked Silverlight myself:
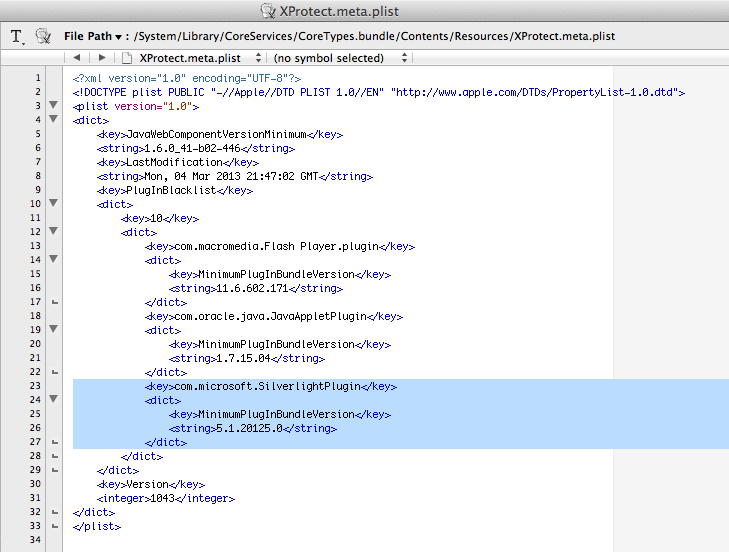
Just wedged it right in there with TextWrangler! Now, what happens when I visit a Silverlight page in Safari?
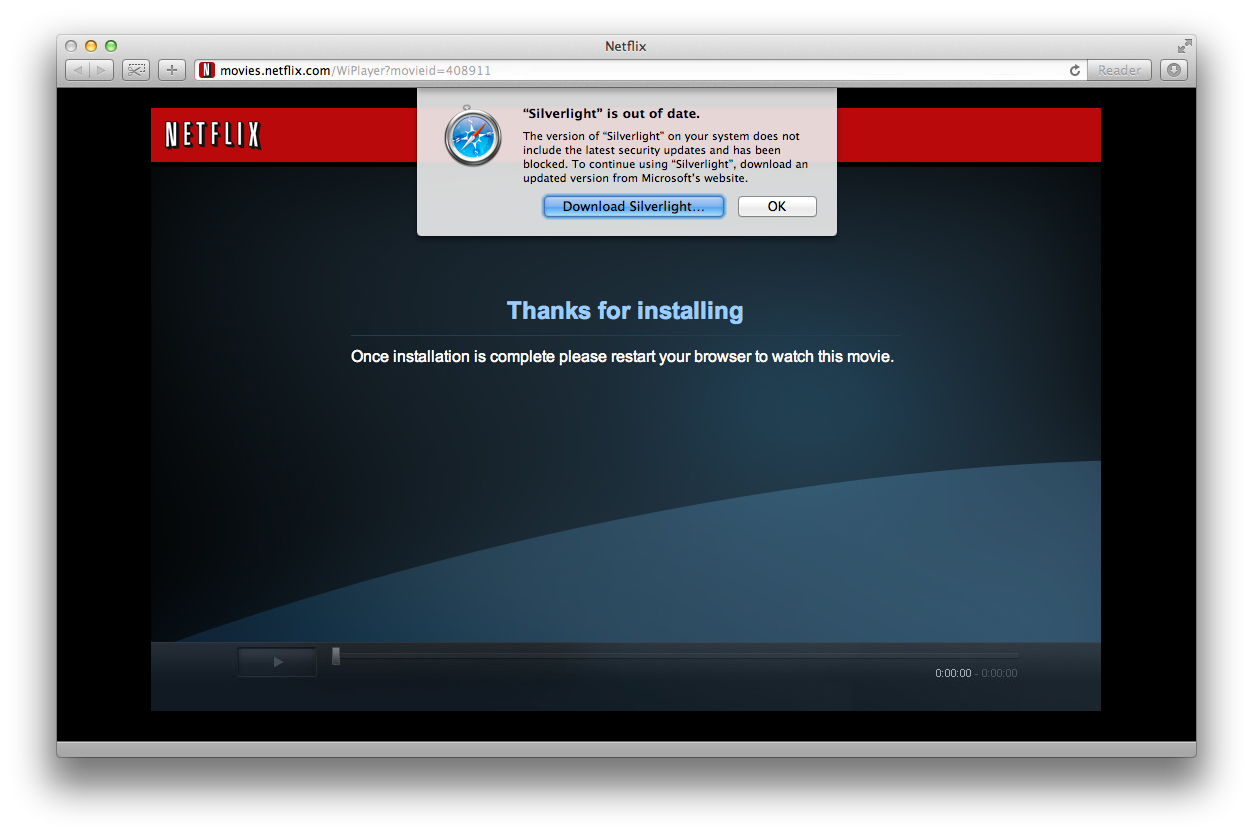
Boom, blocked. Aha! This mechanism is quite extensible to whatever plugin Apple deems insecure. Interestingly though, this warning will appear only once in Safari.
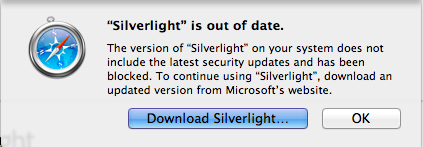
After that your Silverlight content will simply not load and you won’t be told why. The bundle name and version are set under the PreviouslyAnnouncedBlockedPlugins key in com.apple.Safari.plist and that’s it. Clicking OK in a hurry without reading the message might leave you scratching your head, while repeatedly clicking reload at Netlflix.

Taking a peek at my XProtectPluginChecker I see it’s able to compare the installed version to the values XProtect.meta.plist has. My script is working dynamically, as planned, yay! (I fixed a couple bugs the first few days after posting so re-download if you were an early bird user)
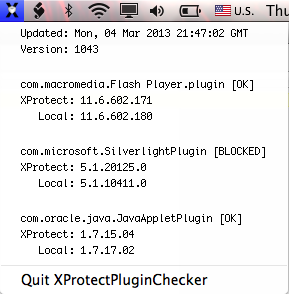 So while you may not be seeing this yet I have a strong feeling you will… and when you do XProtectPluginChecker will let you know.
System Administrator Bonus
Say, Mac SysAdmins, wanna disable Silverlight on all your deployed Macs right now? Why? Maybe you want to turn it off right away and worry about installing the update later? BTW this does not block the plugin in Firefox (they have their own mechanism), Safari only.
sudo /usr/libexec/PlistBuddy -x -c "add :PlugInBlacklist:10:com.microsoft.SilverlightPlugin dict" /System/Library/CoreServices/CoreTypes.bundle/Contents/Resources/XProtect.meta.plist
sudo /usr/libexec/PlistBuddy -x -c "add :PlugInBlacklist:10:com.microsoft.SilverlightPlugin:MinimumPlugInBundleVersion string 5.1.20125.0" /System/Library/CoreServices/CoreTypes.bundle/Contents/Resources/XProtect.meta.plist
That’ll get your XProtect.meta.plist PluginBlacklist dictionary looking something like this (version vary between 10.6 and 10.7/10.8 machines):
 Viola, your Silverlight don’t work no more. :] Now go update it!
 Click to download.


