Determining iCloud Drive and Desktop and Documents Sync Status in macOS

I’m on a roll with iCloud stuff. In this post I’d like to show you how you can determine if either iCloud Drive is enabled along with the “Desktop and Documents Folders” sync feature. While you can use MDM to turn these off, perhaps you like to know who you’d affect first! Perhaps the folks in your Enterprise currently using these features are in the C-Suite? I’m sure they’d appreciate a heads up before all their iCloud docs get removed from their Macs (when MDM disallowance takes affect it is swift and unforgiving).

iCloud Drive Status

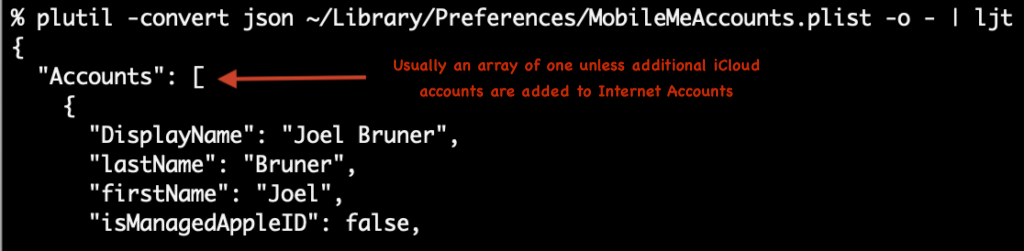
When it comes to using on-disk artifacts to figure out the state of macOS I like to use the analogy of reading tea leaves. Usually it’s pretty straightforward but every now and then there’s something inscrutable and you have to take your best guess. For example iCloud Drive status is stored in your home folder at ~/Library/Preferences/MobileMeAccounts.plist but yet the Accounts key is an array. The question is how and why you could even have more than one iCloud account signed-in?! Perhaps a reader will tell me when and how you would ever have more than one? For now it seems inexplicable.

Update: It seems quite obvious now but as many folks did point out, of course you can add another iCloud account to Internet Accounts and it can sync Mail, Contacts, Calendars, Reminders, and Notes, just not iCloud Drive. Only one iCloud Drive user per user on a Mac. While I do have another AppleID I only use it for Media and Purchases and none of the other iCloud services. The code below stays the same as it is looking at all array entries. Aside: Boy, do I wish I could merge or transfer my old iTunes purchasing/media Apple ID with my main iCloud Apple ID! <weakly shakes fist at faceless Apple bureaucracy that for some reason hasn't solved the problem of merging Apple IDs>

Regardless of that mystery jpt can use the JSONPath query language to get us an answer in iCloudDrive_func.sh and the minified iCloudDrive_func.min.sh. Below is an edited excerpt:

#!/bin/bash
#Joel Bruner - iCloudDrive.func.sh - gets the iCloud Drive status for a console user

#############
# FUNCTIONS #
#############

function iCloudDrive()(

	#for brevity pretend we've pasted in the minified jpt function:
	#https://github.com/brunerd/jpt/blob/main/sources/jpt.min
	#for the full function see https://github.com/brunerd/macAdminTools/tree/main/Scripts

	consoleUser=$(stat -f %Su /dev/console)

	#if root grab the last console user
	if [ "${consoleUser}" = "root" ]; then
		consoleUser=$(/usr/bin/last -1 -t console | awk '{print $1}')
	fi

	userPref_json=$(sudo -u $consoleUser defaults export MobileMeAccounts - | plutil -convert json - -o -)

	#pref domain not found an empty object is returned
	if [ "${userPref_json}" = "{}" ]; then
		return 1
	else
		#returns the number paths that match
		matchingPathCount=$(jpt -r '$.Accounts[*].Services[?(@.Name == "MOBILE_DOCUMENTS" && @.Enabled == true)]' <<< "${userPref_json}" 2>/dev/null | wc -l | tr -d "[[:space:]]")
	
		if [ ${matchingPathCount:=0} -eq 0 ]; then
			return 1
		else
			return 0
		fi
	fi
)
########
# MAIN #
########

#example function usage, if leverages the return values
if iCloudDrive; then
	echo "iCloud Drive is ON"
	exit 0
else
	echo "iCloud Drive is OFF"
	exit 1
fi

The magic happens once we’ve gotten the JSON version of MobileMeAccount.plist I use jpt to see if there are any objects within the Accounts array with Services that have both a Name that matches MOBILE_DOCUMENTS and have an Enabled key that is set to true, the -r option on jpt tells it to output the the JSON Pointer path(s) the query matches. I could have used the -j option to output JSONPath(s) but either way a line is a line and that’s all we need. Altogether it looks like this: jpt -r '$.Accounts[*].Services[?(@.Name == "MOBILE_DOCUMENTS" && @.Enabled == true)]

Again because Accounts is an Array we have it look at all of them with $.Accounts[*]and in the off chance we get more than one we simply say if the number of matches is greater than zero then it’s on. This works very well in practice. This function could best be used as a JAMF Extension Attribute. I’ll leave that as a copy/paste exercise for the reader. Add it to your Jamf Pro EAs, let sit for 24-48 hours and check for results! ⏲ And while some of you might balk at a 73k Extensions Attribute, the execution time is on average a speedy .15s!

#!/bin/bash
#a pretend iCloudDrive Jamf EA 
#pretend we've pasted in the function iCloudDrive() above

if iCloudDrive; then
	result="ON"
else
	result="OFF"
fi

echo "<result>${result}</result>"

iCloud Drive “Desktop and Documents” status

Thankfully, slightly easier to determine yet devilishly subtle to discover, is determining the status of the “Desktop and Documents” sync feature of iCloud Drive. After searching in vain for plist artifacts, I discovered the clue is in the extended attributes of your Desktop (and/or Documents) folder! You can find the scripts at my GitHub here iCloudDriveDesktopSync_func.sh and the minified version iCloudDriveDesktopSync_func min.sh

#!/bin/bash
#Joel Bruner - iCloudDriveDesktopSync - gets the iCloud Drive Desktop and Document Sync Status for the console user

#############
# FUNCTIONS #
#############

#must be run as root
function iCloudDriveDesktopSync()(
	consoleUser=$(stat -f %Su /dev/console)

	#if root (loginwindow) grab the last console user
	if [ "${consoleUser}" = "root" ]; then
		consoleUser=$(/usr/bin/last -1 -t console | awk '{print $1}')
	fi

	#if this xattr exists then sync is turned on
	xattr_desktop=$(sudo -u $consoleUser /bin/sh -c 'xattr -p com.apple.icloud.desktop ~/Desktop 2>/dev/null')

	if [ -z "${xattr_desktop}" ]; then
		return 1
	else
		return 0
	fi
)

#example function usage, if leverages the return values
if iCloudDriveDesktopSync; then
	echo "iCloud Drive Desktop and Documents Sync is ON"
	exit 0
else
	echo "iCloud Drive Desktop and Documents Sync is OFF"
	exit 1
fi

The operation is pretty simple, it finds a console user or last user, then runs the xattr -p command as that user (anticipating this being run as root by Jamf) to see if the com.apple.icloud.desktop extended attribute exists on their ~/Desktop. In testing you’ll find if you toggle the “Desktop and Documents” checkbox in the iCloud Drive options, it will apply this to both of those folders almost immediately without fail. The function can be used in a Jamf Extension Attribute in the same way the iCloudDrive was above. Some assembly required. πŸ’ͺ

So, there you go! Another couple functions to read the stateful tea leaves of iCloud Drive settings. Very useful if you are about to disallow iCloud Drive and/or Desktop and Document sync via MDM but need to know who you are going to affect and let them know beforehand. Because I still stand by this sage advice: Don’t Be A Jerk. Thanks for reading you can find these script and more at my GitHub repo. Thanks for reading!

Decoding macOS automatic login details

In my previous post, Automating automatic login, we looked at how to create the /etc/kcpassword file used for automatic login by using only shell script and built-in command line tools. Why shell only? In preparation for the great scripting runtime deprecation yet to come, I say! Now it’s time to do the reverse for auto login. Let’s get those details back out! Who would need to do such a thing? Imagine a scenario where you the hapless Mac admin have inherited a bunch of Zoom Room Mac minis with auto-login enabled yet no one has documented the passwords used for them! If they are enrolled in Jamf there’s no need to guess what annoying l33t sp3@k password was used, let’s leverage our XOR’ing skills and knowledge of how kcpassword works to send those details back to Jamf.

To get the password back out of /etc/kcpassword we XOR the password again with the same cipher used to obfuscate it originally however but instead of padding it in multiples of 12, we will stop when a character is the same as the current cipher character. FYI when you XOR a value with itself the result is 00 but that’s an unnecessary operation, we can just compare the characters. VoilΓ‘, that’s it.

Here’s the gist of the kcpasswordDecode routine:

Now for something a bit more useful to those with Jamf or other management tools: getAutoLogin. It reports the auto login username, if set, and the decodes the /etc/kcpassword file, if present. Note that until macOS 12 Monterey /etc/kcpassword was not removed when Automatic Login was turned off in System Preferences! Here’s what getAutoLogin looks in the Jamf policy logs:

Plaintext passwords in your logs are probably not the best, but hey, how else you gonna figure out your dang Zoom Room passwords? After retrieving the credentials and storing somewhere more secure, like a password manager, make sure to Flush the policy logs! Thanks for reading, I hope this comes in handy or at the very least was informative and mildly entertaining. πŸ€“

Gist: kcpasswordDecode
Github: getAutoLogin

Automating automatic login for macOS

I recently had some Zoom Room Macs that needed some automation love and I thought I’d share how you can enable Automatic Login via script, perhaps you have several dozen and use Jamf or some other Mac management tool? Interested? Read on! Currently what’s out there are either standalone encoders only or part of larger packaging workflow to create a new user. The standalone encoders lacked some niceties like logging or account password verification and the package method added the required dependency of packaging if any changes were required. Above all, every script required Python, perl or Ruby, which are all on Apple’s hit list for removal in an upcoming OS release. For now macOS Monterey still has all of these runtimes but there will come a day when macOS won’t and will you really want to add 3rd party scripting runtimes and weaken your security by increasing attack surface when you can weaken your security using just shell? 😜 So for some fun, I re-implemented the /etc/kcpassword encoder in shell so it requires only awk, sed, and xxd, all out of the box installs. I also added some bells and whistles too.

Some of the features are:

  • If the username is empty, it will fully disable Automatic Login. Since turning it off via the System Preferences GUI does not remove the /etc/kcpassword file if it has been enabled (!)
  • Ensures the specified user exists
  • Verifies the password is valid for the specified user
  • Can handle blank passwords
  • Works on OS X 10.5+ including macOS 12 Monterey

For the Jamf admin the script is setAutomaticLogin.jamf.sh and for standalone usage get setAutomaticLogin.sh, both take a username and password, in that order and then enable Automatic Login if it all checks out. The difference with the Jamf script is that the first parameter is ${3} versus ${1} for the standalone version.

Also here’s a well commented Gist as a little show and tell for what the shell only version of the kcpassword encoder looks like. Enjoy!

Update: I meant to expound on how it didn’t seem that padding kcpassword to a length multiple of 12 was necessary, since it had been working fine on the versions I was testing with but then I tested on Catalina (thinking of this thread) and was proven wrong by Catalina. I then padded with 0x00 with HexFiend in a successful test but was reminded that bash can’t handle that character in strings, instead I padded with 0x01, which worked on some macOS versions but not others. Finally, I settled on doing on what macOS does somewhat, whereas it pads with the next cipher character then seemingly random data, I pad with the cipher characters for the length of the padding. This works for Catalina and other of macOS versions. πŸ˜…

Big Hat Tip to Pico over at MacAdmins Slack for pointing out this issue in pycreateuserpkg where it’s made clear that passwords with a lengths of 12 or multiples thereof, need another 12 characters of padding (or in some newer OSes at least one cipher character terminating the kcpassword data, thanks! πŸ‘

macOS Compatibility Fun!

Compatibility Questions

If you work with Macs and Jamf then you know every year there’s a new per OS Extension Attribute (EA) or Smart Group (SG) recipe to determine if macOS will run on your fleets hardware. However I asked myself: What if a single Extension Attribute script could fill the need, requiring only a periodic updating of Model IDs and the addition of new macOSes?

Then I also asked: Could this same script be re-purposed to output both text and CSV, not just for the script’s running host but for a list of Model IDs? And the answer was a resounding yes on all fronts!

EA Answers

So, my fellow Jamf admin I present to you macOSCompatibility.sh in its simplest form you just run the script and it will provide ultra-sparse EA output like: <result>10.14 10.15 11</result> this could then be used as a Smart Group criteria. Something like “macOS Catalina Compatible” would then match all Macs using LIKE 10.15 or “Big Sur Incompatible” would use NOT LIKE 11, of course care would be taken if you were also testing for 10.11 compatibility, however the versionsToCheck variable in the script can limit the default range to something useful and speeds things up the less version there are. I hope this helps Jamf admins who have vast unwieldy fleets where hardware can vary wildly across regions or departments,

CSV Answers

Now if you provide a couple arguments like so: ./macOSCompatibility.sh -c -v ALL ALL > ~/Desktop/macOSCompatibilityMatrix.csv you will get a pretty spiffy CSV that let’s you visualize which Mac models over the years have enjoyed the most and least macOS compatibility. This is my favorite mode, you can use it to assess the OS coverage of past Macs.

See macOSCompatibilityMatrix.csv for an example of the output. If you bring that CSV into Numbers or Excel you can surely liven it up with some Conditional Formatting! This is the barest of examples:

Can you spot the worst and best values?

Text Answers

If you don’t use the -c flag then it’ll just output in plain or text, like so: ./macOSCompatibility.sh -v ALL ALL

iMacPro1,1: 10.13 10.14 10.15 11
MacBook1,1: 10.4 10.5 10.6
MacBook2,1: 10.4 10.5 10.6 10.7
MacBook3,1: 10.5 10.6 10.7
MacBook4,1: 10.5 10.6 10.7
MacBook5,1: 10.5 10.6 10.7 10.8 10.9 10.10 10.11
MacBook6,1: 10.6 10.7 10.8 10.9 10.10 10.11 10.12 10.13
MacBook7,1: 10.6 10.7 10.8 10.9 10.10 10.11 10.12 10.13
MacBook8,1: 10.10 10.11 10.12 10.13 10.14 10.15 11
MacBook9,1: 10.11 10.12 10.13 10.14 10.15 11
MacBook10,1: 10.12 10.13 10.14 10.15 11
MacBookAir1,1: 10.5 10.6 10.7
MacBookAir2,1: 10.5 10.6 10.7 10.8 10.9 10.10 10.11

Wrapping Up

Now, it’s not totally perfect since some models shared Model IDs (2012 Retina and Non-Retina MacBook Pros for example) but for the most part the Intel Mac Model IDs were sane compared to the PPC hardware Model IDs: abrupt jumps, overlaps, and re-use across model familes. Blech! I’m glad Apple “got religion” for Model IDs (for the most part) when Intel CPUs came along. I did attempt to go back to 10.1-10.3 with PPC hardware but it was such a mess it wasn’t worth it. However testing Intel, Apple Silicon and VMs against macOS 10.4 – 11+ seems to have some real use and perhaps you think so too? Thanks for reading!

secret origins: the jpt

On building a JSON tool for macOS without using Python, perl, or Ruby.

In my work as a Macintosh engineer and administrator I’ve noticed macOS has lacked a bundled tool for working with JSON at the command line. Where XML has its xpath, if your shell script needs some JSON chops, it’ll require an external binary like jq or something else scripted in Python, Ruby or perl using their JSON modules. The problem is, those runtimes have been slated for removal from a future macOS. So I took that as challenge to devise a method to query and modify JSON data within shell scripts, that didn’t use one of those deprecated scripting runtimes and didn’t require an external binary dependency either. Could I achieve robust and native JSON parsing on a Mac by simply “living off the land”?

Why not just re-install the runtimes when Apple deprecates them?

“Why limit yourself like this? Just re-install the runtimes and move on”, you may ask. Well, I’d like to think that limitations can inspire creativity but we should also consider there may be some other reasons why Apple is discontinuing the inclusion of those runtimes. Some may say, “Apple Silicon + macOS 11.0 is the perfect time for them to clean house”, to which I’d have to agree that’s a very good reason and likely a factor. Others could say they are looking to tighten the screws to keep out unsigned code: maybe, they do like to glue things shut! But really, I think it’s more akin to the web-plugins of yore like Java and Flash. Apple does not want to be the conduit for deploying 3rd party party runtimes which increase the attack surface of macOS. This seems like the most reasonable of the explanations. So, if you accept that Apple is attempting to reduce attack surface, why increase it by re-installing Python, Ruby, or perl, just so a transient script (like a Jamf Extension Attribute) can parse a JSON file? My answer to that, is you don’t. You play the hand you’re dealt. Game on!

Looking for truffles (in a very small back yard)

Despite having another project (shui) that can output and invoke Applescript from within a shell scripts for generating user interfaces, I definitely knew that Applescript was not the way to go. Apple however, added to the languages Open Scripting Architecture (OSA) supports back in 2014 with OS X Yosemite (10.10), they added Javascript along with a bridge to the Cocoa Objective-C classes and they called it JXA: Javascript for Automation. This seemed like a promising place, so I started playing with osascript and figured out how to load files and read /dev/stdin using JXA, and while looking for an answer for garbled input from stdin I came upon a Japanese blog that mentioned jsc the JavaScriptCore binary which resides in the /System/Library/Frameworks/ JavaScriptCore.framework. Arigato! Pay dirt! πŸ€‘ jsc does exactly what we need it to do: It can interpret Javascript passed as an argument, can access the filesystem and read from /dev/stdin, and best of all is in non-Private System level Framework that exists all the way back to OS X 10.4! Just the kind of foundation on which to build the tool.

Homesteading jsc

The existence of jsc goes back all the way to OS X Tiger and it’s functionality has evolved over the years. In order to have a consistent experience in jpt from macOS 10.4 – 11.x+ a few polyfills had to be employed for missing functions, along with a few other workarounds regarding file loading, printing and exit codes (or lack thereof). Once those were addressed the jsc proved to be a highly optimized Javascript environment that’s blazingly fast. It spans 13 macOS releases and is even present in many Linux distros out-of-the-box (Ubuntu and CentOS) and can even be run on Windows when the Linux Subsytem is installed.

With the host environment sorted, I began working with the original JSONPath code by Stefan Goessner as the query language. I didn’t know about JSON Pointer yet so this strange beast was all I knew! It worked out really. I went full throttle into developing the “swiss army knife” of JSON tools. I really leaned into the Second System Effect, as described in the Mythical Man-month, it’s when you put every doodad, gizmo and doo-hicky in your 2nd product (my first simple JSON pretty-printer built in JS on jsc). Eventually though, after I reached a feature plateau, I came back around to the address the quirks of the original JSONPath code. I ended up rewriting signifigant chunks of JSONPath and released it as it’s own project: brunerd JSONPath. But I digress, let’s get back to the JSON Power Tool.

jpt: powers and abilities

At it’s most basic, jpt will format or “pretty print” any JSON given. jpt can also handle data retrieval from JSON document using either JSONPath or JSON Pointer syntax. JSONPath, while not a standard, is a highly expressive query language akin to XPath for XML, with poweful features like recursive search, filter expressions, slices, and unions. JSON Pointer on the other hand is narrower in focus, succint and easily expressed, and standardized but it does not offer any of the interogative features that I feel make JSONPath so intriguing. Finally, jpt can also modify values in a JSON document using standardized JSON Patch operations like: add, remove, replace, copy, move, and test, as well as the also standardized JSON Merge Patch operation. Altogether, the jpt can format, retrieve and alter JSON documents using only a bit of outer shell script plus a lot more Javascript on any macOS since 10.4! πŸ˜…

Where can I get the jpt?

Stop by the project’s GitHub page at: https://github.com/brunerd/jpt

There you will find the full source and also a minified version of the jpt for inclusion within your shell scripts. Since it’s never compiled you can always peer inside and learn from it, customize it, modify it, or just tinker around with it (usually the best teacher).

Future Plans

There will undoubtedly be continued work on the jpt. Surely there are less than optimal routines, un-idiomatic idioms, edge cases not found, and features yet to be realized. But as far as the core functionality goes though, it’s fairly feature complete in my opinion. Considering that one of my top 10 StrengthsFinder qualities is “Maximizer”, the odds are pretty good, I’ll keep honing the jpt‘s utility, size (smaller), and sharing more articles with examples on the kinds of queries and data alteration operations the jpt can so perform. Stay tuned!

New Projects: jpt and shui, Now Available

Between March and October 2020 I had some great ideas for command line Mac utilities the MacAdmin could apprecite and I had the time to devote to their realization. I’m excited to present these two open source projects, available on GitHub: jpt and shui. I hope they can add richness to your shell scripts’ presentation and capabilities without requiring additional external dependancies.

jpt – the “JSON Power Tool” is a Javascript and shell script polyglot that leverages jsc, the JavascriptCore binary that is standard on every Mac since 10.4 and since the jpt is purposefully written in ES5 to maintain maximum compatibility, why yes, this tool does run on both PPC and Intel Macs all the way back to OS X Tiger and then all the way forward to the latest 11.0 macOS Big Sur! Many Linux distros like CentOS and Ubuntu come with jsc pre-installed also, even Windows with the Linux Subsystem installed can run jsc and therefore can run the jpt!

What you can do with the jpt? Query JSON documents using either the simple yet expressive JSONPath syntax or the singular and precise JSON Pointer (RFC6901) syntax. The output mode is JSON but additional creative output modes can render JSONPaths, JSON Pointer paths, or even just the property names with their “constructor” types (try -KC with -J or -R) Textual output can be encoded in a variety of formats (hex/octal/URI encoding, Unicode code points, etc…), data can be modified using both JSON Patch (RFC6902) operations (add, replace, remove, copy, move, test) and also JSON Merge Patch (RFC7386) operations. JSON can be worked with in new ways, try -L for “JSONPath Object Literal” output to see what I mean. Or you simply feed jsc a file to pretty-print (stringify) to /dev/stdout. I’ll be writing more about this one for sure.
Github project page: jpt
Tagged blog posts: scripting/jpt

shui – first-class Applescript dialog boxes in your shell scripts without needing to remember esoteric Applescript phrasings! If you think it’s odd for code to have possessive nouns and are more comfortable in shell, you’re not alone. shui can be embedded in either bash or zsh scripts but it can also output Applescript if you really want to know how the sausage is made or want to embed in your script without shui. Hopefully shui will let you forget those awkward Applescript phrasing and focus on your shell script’s features and functionality. It uses osascript to execute the Applescript and launchctl to invoke osascript in the correct user context so user keyboard layouts are respected (vs. root runs). Check out the project page for demo videos and then give shui a try.
Project page: shui
Tagged blog posts: scripting/shui